|
Transfer Function Pane
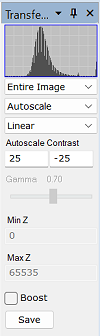
The Transfer Function Pane is used to
interactively adjust the
transfer function of an image. This
docking pane attaches to the
Image Window and is available in both horizontal and
vertical formats. The Transfer Function Pane provides
methods and properties for adjusting the transfer
function. The methods are chosen using dropbox selectors. The
methods use properties specified in text fields and a gamma
slider.
-
These parameters can also be set from submenus
of the top-level View > Transfer
Function menu for
Image Windows.
-
The global default transfer function
properties are set using the
Transfer
Function Properties dialog. The docking panes are initialized
using these stored values.
-
Open the Transfer Function Pane from the
View > Transfer Function menu or
by clicking the  button on the
Image Tools toolbar. button on the
Image Tools toolbar.

|
|
If you change settings for an
Image Set, the changes may be applied to either the
active image or to the entire set, depending on the state of the
 (Process) button. For RGB images, the
adjustments of the transfer function are handled by the
Palette Properties dialog. The current transfer
function parameters are shown below the histogram graph. In
top-down order are the Sample Region,
Range, and Stretch settings. These properties are described
in detail in
Transfer Functions. See
Choosing Transfer Function Properties for tips
on setting the controls. (Process) button. For RGB images, the
adjustments of the transfer function are handled by the
Palette Properties dialog. The current transfer
function parameters are shown below the histogram graph. In
top-down order are the Sample Region,
Range, and Stretch settings. These properties are described
in detail in
Transfer Functions. See
Choosing Transfer Function Properties for tips
on setting the controls.
Transfer Function properties can be specified using
controls on the pane, by using equivalent properties in the
View > Transfer Function submenus,
or by using menus commands opened from the drop menu on the
 button on the
Image Tools Toolbar. button on the
Image Tools Toolbar.
|
|
Tip:
|
Changing parameters while running an
image animation (fast forward or fast reverse) is not
advised. Mira fills the controls with the image-specific values
each time a new image is displayed, and that will overwrite the
parameters you are trying to change. To change parameters, stop the
animation, set the desired parameters, and then restart the
animation.
|
|
Tip:
|
Set the transfer function properties before
changing the selections in the drop boxes. Then the dropbox
selection uses the specific parameters.
|
Transfer Function Selectors
These controls are dropbox selectors that determine
how properties are applied to mapping the image value histogram
into grayscale.
|
Sample Selector (top)
|
The Sample selector specifies the region
where the image intensity is sampled for calculating the transfer
function. The options are as follows:
Entire Image:
Samples the entire image.
Cursor: Samples
intensity inside the
Image Cursor.
Cursor Live: Samples
intensity inside the
Image Cursor and updates as the cursor moves. This
continually updates as the cursor is moved or resized on the
image.
If you close the transfer function pane with
Cursor Live selected, Mira switches to
Cursor mode on close.
|
|
|
|
|
Range Selector
(middle)
|
The Range parameter specifies how the
limits (end points) of image intensity are determined for mapping
the intermediate values to grayscale. All of these methods involve
computing the image value histogram:
Autoscale: Determines
the optimal range of the image data. This method uses the entire
image to compute the histogram. The Autoscale method uses the two properties
Contrast and Offset under the Autoscale
Contrast caption.
Min/Max: Uses the full
range of the image histogram.
99.9%: Uses 99.9% of
the histogram range.
99.5%: Uses 99.5% of
the histogram range.
99%: Uses 99% of the
histogram range.
98%: Uses 98% of the
histogram range.
95%: Uses 95% of the
histogram range.
Percentile: You
specify the percentile histogram limits.
Specify Z: You specify
the image values independent of the image histogram
|
|
|
|
|
Stretch Selector
(bottom)
|
The Stretch provides controls the way the
transfer function maps image values to grayscale between the
limits. The options are as follows:
Linear: Uses no Bias
with equal Grayscale spacing between the transfer function's
limiting values.
Log: Extends the
transfer function to greater contrast at lower intensity
values.
Gamma: Extends the
transfer function to higher or lower intensity based on the gamma
setting. A gamma less than 1 biases toward higher contrast in lower
intensity, and vice versa.
|
Transfer Function Properties
These values are used by the dropbox selectors to
adjust how the selectors calculate the image histogram and map it
to gray scale.
|
Autoscale Contrast
(Contrast)
|
If Autoscale is
selected, Mira determines a nice scaling for mapping image values
to gray levels. This method samples the entire image and
maps its values to gray levels using two parameters under the
Autoscale Contrast caption.
After changing either of these properties, the
Autoscale transfer function is applied
by pressing the Enter key:
Contrast is left-most
property, which is the actual contrast factor. This is in the range
5 to 100. A lower number gives lower contrast.
Offset is the
right-most property, which shifts the histogram median up or down
in grayscale. This is in the range -100 to 100. A negative value
shifts the median to a darker gray level.
Recommendation: Use 25 and -25 as good starting
points.
|
|
Min Z
|
Specifies the minimum Z (intensity) value. This is
active only when the Specify Z stretch
is selected.
|
|
Max Z
|
Specifies the maximum Z (intensity) value. This is
active only when the Specify Z stretch
is selected.
|
|
Min %
|
Specifies the minimum percentile intensity. This
is active only when the Percentile
stretch is selected.
|
|
Max %
|
Specifies the maximum percentile intensity. This
is active only when the Percentile
stretch is selected.
|
|
|
|
|
Gamma Slider
|
The slider sets the gamma value when the
Gamma stretch is selected.
|
Other Controls
|
 Boost Boost
|
Check this box to selectively boost the contrast
by enhancing contrast where image values crowded into a narrow
range. In astronomical images, this crowding is usually near the
background level, and the method usually makes the background very
contrasty. See
Using the Boost Transfer Function Option.
|
|
[Save]
|
Opens the
Transfer
Function Properties dialog for saving the current settings as a
profile for future use.
|
Related Topics
Transfer
Function Properties
Transfer Functions
Choosing Transfer Function Properties
Using the Boost Transfer Function Option
Setting Application Properties
Displaying Images
Image Windows
Palette Pane
Palette Properties dialog
Mira Pro x64 8.83 User's Guide, Copyright Ⓒ 2026 Mirametrics, Inc.
All Rights Reserved.
|


