|


|


|
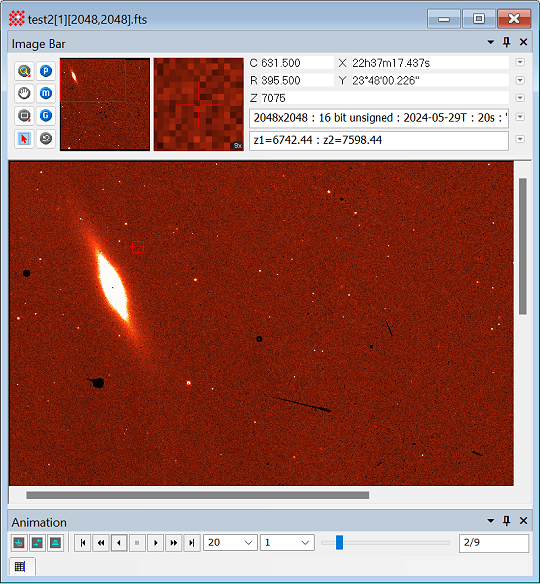
Image Windows An Image Window is the type of view window Mira uses to display 2-dimensional images. The Image Window also provides numerous features through optional toolbars and docking panes. Several of these extra command bars are shown in the Image Window below. The largest optional component of the Image Window is the Image Bar that appears between the window caption and the displayed image. This docking pane provides quick access to image coordinates and basic image information. It may be hidden or tabified to conserve screen space. Use the Docking Panes Toolbar button to save its current state for future Image Windows. See the topic FITS Format Overview to learn how Mira handles FITS Format data, particularly a FITS Extension file containing multiple Header-Data Units or an image with multiple "planes" (NAXIS keyword > 2). The figure below shows a typical image window with the Image Bar at top and Animation Bar at bottom. A FITS Extension file containing 8 images represents 8 of the 9 images opened as an Image Set. with the "Flame" Palette.
Setting Window Properties and Image PropertiesSeveral properties can be defined for the Image Window and images opened into it, including the window properties, image cursor properties, transfer function properties, and others. Many of these can be changed the Image Window is opened. A few other properties, such as the default image zoom, cannot be set after the window is opened. See the Related Topics at the bottom of this page. Script InterfaceThe Mira Pro x64 Script language provides an extensive collection of script classes and functions that work with Image Windows. There are two ways a script can be attached to Image Window data:
When a direct script is executed, it is automatically provided both a CImageView script object attached to the Image Window and a CImage script object attached to the currently displayed image. Scripts executed globally or from outside an Image Window, must use a script command to attach the target window and their data.
When a script is executed directly from an Image Window, it must connect to the current window and data. To do this, the script calls attach_imageviewinternal() which returns script objects attached to the current image and current image window, as follows: I, V = attach_imageviewinternal() where the two returned objects are as follows: I is a CImage script object attached to the current image. V is a CImageView script object attached to the current image window. When you create a new script directly from the Script Manager Pane in an Image Window, Mira automatically inserts the following line: ParentImage, ParentImageView = attach_imageviewinternal() In some of the sample scripts designed for direct execution from an Image Window, you may see two variables: PARENTIMAGE and PARENTIMAGEVIEW. This means Mira already processed the attach_imageviewinternal function. In your own scripts, call attach_imageviewinternal().
Shortcuts and Accelerator KeysThe Image Window contains numerous keyboard shortcuts and accelerator keys to perform common commands for measurements, plots, and other operations on the image or Image Set. These are several groups of keystroke commands as described below. In addition, the Image Keys Pane describes all keystroke commands for the Image Window. Window Accelerators using Ctrl and Shift Modifiers
Single Keystroke CommandsThe Image Window provides numerous keystrokes for creating plots, making measurements, and performing other commands. These are described in Image Window Keystroke Commands. Most of these commands work with the Image Cursor (not the window pointer) and are not case sensitive. These single keystrokes do not use the Ctrl, Alt, and Shift modifiers. The Image Window is activated for keystroke input when it is top-most and has the keyboard focus. Keystroke Commands for the Image Cursor and Image SetsSeveral additional keystrokes that are not command accelerators are recognized by image windows. These require the window to have the keyboard focus.
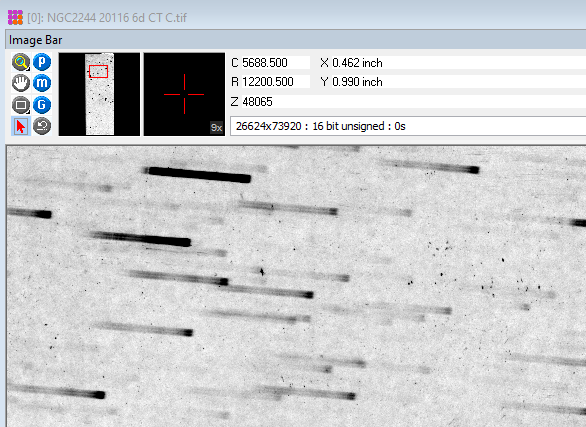
Image Size LimitsPractically speaking, Mira Pro x64 has no realistic limit to the maximum size of an image or image set. The dimensional limits are 2 billion pixels on each axis. In the Mira Pro Script Language, class methods that work with image data have the same limits. The screenshot below shows a scanned photographic plate of Schmidt telescope objective prism spectra. This image file is just under 4 GB in size and required 3 seconds to open and display from an an SSD drive. A Mira user has reported processing 26GB images. Note that the 32-bit version of Mira Pro x64 (that is, Mira Pro x32) has the standard 32-bit limit of 4GB maximum image size.
Related TopicsImage Window Keystroke Commands
Mira Pro x64 8.83 User's Guide, Copyright Ⓒ 2026 Mirametrics, Inc.
All Rights Reserved. | ||||||||||||||||||||||||||||||||||||||||||||||||||||