|


|


|
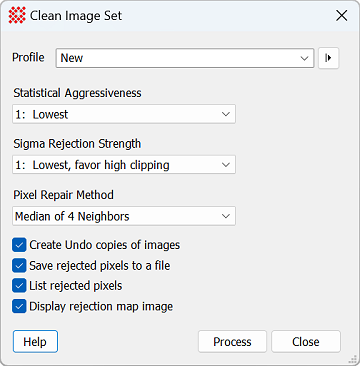
Clean Image Set The Clean Image Set command identifies and repairs random image artifacts caused by a cosmic rays and ionizing radiation events that appear at a given location in one image but not another. This command works on a displayed Image Set. The artifact coordinates may be saved to a text file or listed in the Main Message Pane, where they may be copied or opened into a text editor. If the Message pane is closed, use the Windows > Main Messages command to open it. Example: See the Tutorial: Cleaning Artifacts from an Image Set.
Since this command often works with a large
Image Set "undo" backup copies are not automatically
created, for the purpose of reducing memory usage. If you want
Undo copies, tick the Overview of the MethodThe Clean Image Set algorithm detects random "events" that appear at the same location in only 1, 2, or a few images of a large collection of images of the same field of view. The algorithm uses the pixel information from a series of images to identify the artifacts in each of the individual images. Therefore, this command works only on an Image Set made from multiple images of the same field of view. To separate artifacts from persistent features, the images must be aligned through the image set. If an image set is registered in software before cleaning, poorly corrected hot or cold pixels shift around, causing the algorithm to detect them the same as true radiation events. This algorithm detects outlier pixel values by comparing them with a statistical model based on information from the entire image set. This has advantages over other methods commonly used to reduce outlier noise from radiation events: Most cosmic ray detection algorithms use information from neighboring pixels within a single image. The weakness of such methods is their difficulty in distinguishing outliers from sharp persistent features such as the peaks of stars. Conversely, standard image combining techniques using rejection methods such as Sigma Clipping, Alpha Clipping, or the Median, can remove outlying pixels as part of merging, but end up producing a single image (see Statistical Estimators for Image Combining). One weakness of rejection methods is that the Signal to Noise Ratio ("SNR") is lowered in comparison with simple Mean combining, either as a result of rejecting ("clipping") pixels or by the nature of the Median process itself. the median reduces the SNR of all pixels by about 20%. In comparison, the present algorithm attempts to modify only the true outlier pixels and does so in the individual images without actually combining the images. This algorithm requires that the image features (not the defects) are aligned so that a statistical model can by built for pixel variations within the image set. If the images require alignment, several tools are available, including the Image Registration package, the Align by WCS, and the Align on Point commands. When registering images, consider choosing the nearest neighbor resampling option to preserve the noise structure within each image.
Clean Image Set Properties
Related TopicsTutorial: Cleaning Artifacts from an Image Set Repairing Artifacts and Cosmetic Defects
Mira Pro x64 8.83 User's Guide, Copyright Ⓒ 2026 Mirametrics, Inc.
All Rights Reserved. |