Contents 

Mira Pro x64
Contents
New Features
Getting Application Help
About this Document
Tech Support
Getting Started
Glossary of Terms
Selecting Source Images
Setting Application Properties
Command Dialogs
Screen Capture
Mira's Special Folders
Changing the GUI Theme
Critical Concepts
Tip of the Day
Tutorials
Overview
Displaying an Image
Displaying an Image Set
Creating Plots from Images
Introduction to Image Registration
Making a Scatter Plot of Measurements
Using FITS Keywords to Analyze Image Data
Introduction to Aperture Photometry
Doing Time Series Photometry
Introduction to File Event Scripting
Cleaning Artifacts from an Image Set
Introduction to Source Extraction
Introduction to Astrometric Calibration
Examples
File Lists
Creating File Lists
Opening Files from File Lists
Images
The Boost Transfer Function Option
Image Rotation
Adding Labels to an Image
Editing the FITS Header
Image Registration
Plots
Plot Windows
Plotting Examples
Plotting an Averaged Line
Row Plots
Adding Series to a Line Profile Plot
Changing Plot Series Attributes
Plotting in World Coordinates
Comparison of Histogram Preferences
Contour Plotting Smoothing
3-D Plots
3-D Pixel Representations
3-D Z-Scaling
Measurements
Distance and Angle
Selecting Cells in a Grid Control
Tutorial: Making a Scatter Plot of Measurements
Fixing Header Problems in Photometric Data
Importing a Photometry Catalog
Image Basics
Image Types
Image Sets
Overview
Image Set Flags
Image Set Properties
Image Set Toolbar
Image Set Applications
Image Sets Menu
Duplicating an Image Set
File Lists
Overview
Creating file lists
Editing file lists
Opening files from file lists
Opening Images
Overview
File opening and saving commands
Using Drag & Drop
Opening image files
Creating an image catalog
Duplicating an Image
Duplicating an Image Set
Opening files from file Lists
Using File Opening Plug-ins
Selecting Source Images
Importing a Binary Image
Importing a Text Image
Saving Images
Saving a single image
Saving an image set
Saving all image set members
Saving an image set to a Folder
Saving an image set with a filename Suffix
Saving an image set to a file list
Exporting as a binary image
Exporting as a text image
Palettes
Overview
Image Palettes
Palette Pane
Palette Properties
Using the Palette Property Trackbars
Rubber Banding the Palette Graph
Importing Palettes
Transfer Functions
Overview
Choosing Transfer Function Properties
Using the Boost Transfer Function Option
Default Transfer Function Properties
Transfer Function Pane
Transfer Function Popup Menus
Image Cursor
Overview
Image Cursor Properties
Setting default and local properties
Image Window Properties
Image Plot Properties
Histogram Properties
Centroid Properties
FWHM Preferences
Radial Profile Properties
Palette Properties
Transfer Function Properties
General Properties
Selecting source images for commands
Overview
Image Display
Image Windows
Image Bar
Animation Bar
User Interface
User Interface Overview
Working with Toolbars
Initializing Toolbars and Docking Panes
Docking Panes
Command Dialogs
Command Toolbars
Main Message Pane
Image Cursor Toolbar
Image Keys Pane
Status Bar
Accelerator Keys
Profile Control
Status Bar
Save Window Position
GUI Theme
Changing the GUI theme
Context Menus
Image Context Menu
Image Context Menu for an image set
Plot Context Menu
3-D Plot Context Menu
Grid Context Menu
Dialog Styles
Command Dialogs
Dialog Buttons
Docking Panes
Overview of Docking Panes
Docking Panes Toolbar
Image Bar
Animation Bar
Image Keys Pane
Measurement Panes
Initializing Toolbars and Docking Panes
Property Profiles for Commands
Overview
Profile Control
Grid Controls
Overview
Report Windows
Grid Context Menu
Measurement Panes
Table Properties
Overview
Table Appearance Properties
Table Printing Properties
Menus
Tear-off menus
Main Context Menu
Default Menu Bar
Align Images Menu
Pictures of Menus
Creating new text documents
Default File Menu
Calibration Menu
Diagnostics menu
Edit Menu
File Menu
Measure Menu
Mira Windows
Image Windows
Plot Windows
Grid Controls
Image
Overview
Animation Pane
Image Bar
Image Set Toolbar
Image Window Keystroke Commands
Image Keys Pane
Adjusting the Image Cursor
Command Modes
Cursor Command Modes
Roam Mode
Cursor Mode
Plot
Overview
Plotting Images and Data
Creating a Plot from Table Data
Plotting Examples
Plot Bar
Plot Animation Bar
Plot Properties
Plot Series Properties
Plot Marker Properties
Image Plot Properties
Save Window Position
Chart
Chart Windows
Plotting Images and Data
Creating a Chart from Table Data
Chart Command Menu
Chart Axis Limits
Chart Properties Pane
Chart Series Properties
Chart Titles
Chart Legend Properties
Save Window Position
3-D Plot
Overview
3-D Animation Toolbar
3-D Rotation Toolbar
3-D Drawing Attributes
3-D Light Source Dialog
3-D Viewpoint Dialog
3-D Window Dialog
Save Window Position
File Open
Open Command
Opening & Saving Files
Opening Files from File Lists
Report
Overview
Grid Controls
Report Commands
Report Window Menu
Save Window Position
Grid Properties
Overview
Table Appearance Properties
Table Printing Properties
Text Editor
Overview
Creating a new text document
Text Editor Edit Menu
Text Editor View Menu
Save Window Position
Script Editor Window
Script Editor Toolbar
Script Editor Context Menu
Script Editor View Menu
Save Window Position
Plug-ins
File Opening Plug-ins
Image Processing Plug-ins
Toolbars
Working with Toolbars
Command Toolbars
Image Keys Pane
3-D Animation Toolbar
3-D Rotation Toolbar
Cursor Tools Toolbar
Image Cursor Toolbar
Image Plot Toolbar
Image Set Toolbar
Image Tools Toolbar
Image Bar
Calibration Tools Toolbar
Interactive Repair Toolbar
Main Toolbar
Measurements Toolbar
Working with FITS Format
Overview
FITS Format Definition
FITS keywords
FITS Header Editor
FITS Header Pane
FITS image orientation
List COMMENT Keywords
List HISTORY Keywords
List Statistics Keywords
List WCS keywords
MIRAPROC keyword
Editing the FITS header
Modifying keywords
Adding metadata at file open or file save
Creating an image list from keywords
Searching images for keyword values
Viewing the FITS File Header
Fixing Header Problems in Photometric Data
Image Information Editor (RGB images)
Coordinate Systems
Overview
Image Coordinate System
Pixel Coordinate Definition
Subpixel Coordinate Definition
World Coordinate System
Image Display Orientation
FITS Image Orientation
Image Coordinate Display
Coordinate Commands
Go to cursor coordinates
Go To Object
Astrometric Calibration
Set an arcsecond scale
Set an equatorial scale
Set a linear scale
Set independent linear scales
Set linear world coordinate units
Setting brightness units
Alignment Commands
High precision image registration
Align on Object
Align on Point
Align by WCS
Coordinate Readout
Set X-Axis Linear Format
Set Y-Axis Linear Format
Set Pixel Value Format
Select Image Properties
World Coordinate System
Overview
World Coordinate System Keywords
Deleting the WCS
Astrometric Calibration
Overview
Tutorial
Entering coordinate data
Changing reference point data
Calibration Preferences dialog
Plate Solution Strategy
Other preferences
Measuring Images
Overview
Measurement Panes
Image Measurements Toolbar
Image Cursor Toolbar
Image Keys Pane
Moving the image cursor to a coordinate
Setting Application Properties
Testing using synthetic images
Setting statistical estimator properties
Opening a table in Microsoft Excel
Tutorial: Working with Measurements in a Grid
Angle Measurements
Command overview
Marker properties
Aperture Photometry
Overview of aperture photometry
Apphot Pane for photometry results
Tutorial: Introduction to Aperture Photometry
Tutorial: Doing Time Series Photometry
How Magnitude and Errors are calculated
Editing target data and standard star data
Automatic detection of objects
Plotting a light curve
Kwee - van Woerden
Setting marker attributes
Preparing a report for the AAVSO
Setting the aperture size and shape
Setting photometry keywords
Fixing header problems in photometric data
Importing a photometry catalog
Calculate Julian Date
Definitions of measurements
Definitions of errors
Understanding signal to noise ratio
Aperture Photometry Toolbar
Aperture Photometry Properties
Aperture Photometry Properties dialog
Point Markers
Calibration Results
Image Information
Photometry Keywords
AAVSO Reporting
Other Properties
Measurement Output
Astrometric Calibration
Overview
Tutorial
Plate Solution Strategy
Centroid Measurements
Command overview
Centroid properties
Distance & Angle Measurements
Command overview
Measuring Distance and Angle
Example
Angle Measurement Definition
FWHM Measurements
Command overview
FWHM properties
PSF Fit Properties
Labeling Images
Overview
Label Properties
Examples
Line Measurements
Command overview
Marker properties
Plot Line Measurements
Command overview
Marker Properties
Plot Point Measurements
Marker Properties
Shape Properties
Point Measurements
Command overview
Marker properties
Region Measurements
Command overview
Marker properties
Region properties
Statistics Measurements
Command overview
Statistics Measurements
Statistics properties
List Statistics Keywords
Remove Statistics Keywords
Marker Properties
Overview
Drawing Properties
Centroid Properties
Region Properties
Copying & Pasting Markers
Copy Markers
Paste Markers
Scatter Plots
Scatter Plot command
Tutorial: Making a Scatter Plot of Measurements
Selecting Cells in a Grid Control
Point Sampling
Overview
Pixel Table Pane
Viewing and editing pixel values
Report Windows
Overview
Grid Controls
Grid Context Menu
Optimizing the column width
Opening a table in Excel
Table Properties
Table Printing Properties
Table Appearance Properties
Plotting Images and Data
Overview
Plot Bar Pane
Creating a Chart from Table Data
Creating a Plot from Table Data
Examples of plot types
Examples of row plots
Setting Application Properties
Horizontal Slice Plot
Vertical Slice Plot
Plot Windows
Overview
Creating a Plot from Table Data
Plot Bar
Plot Animation Bar
Plot Keys Pane
Plot Context Menu
Set X-Axis Format
Set Y-Axis Format
Plot Series Data
Plot Measurements
Go to Source Image
Plot Averaging Modes
Saving a plot as a text file
Save Window Position
Window Properties
Plot Properties
Plot Series Properties
Chart Windows
Chart Windows
Creating a Chart from Table Data
Chart Command Menu
Chart Axis Limits
Chart Properties Pane
Chart Series Properties
Chart Titles
Chart Legend Properties
Save Window Position
Working with Plot Series
Changing Plot Series Attributes
Overplotting & Animating
Go to Source Image
Copying & pasting plot series
Adding series to a line profile plot
Plot Default Marker Properties
Setting marker attributes before the plot
Default Series Properties
Plot Series Properties
Plot Series Data
Column and Row Profile Plots
Column profile plots
Making a column profile plot
Row profile plots
Making a row profile plot
Plotting an averaged line
Overview
Plot Averaging Modes
Changing the Plot Appearance
Changing Plot Attributes
The Plot Attributes dialog
Using a dialog shortcut
X Axis Properties
Y Axis Properties
Plot Labels
Frame Properties
Selecting a Coordinate System
Plot coordinate systems
Using World Coordinates
Comparison of coordinate systems
Line profile plots
Command
Creating a Line Profile plot
Adding series along different lines
Adding parallel series
Preferences
Setting Line Profile preferences
Centroid Preferences
Marker Properties
Radial profile plots
Making a radial profile plot
Radial Profile Properties
PSF Fit Properties
Histogram plots
Making a Histogram plot
Histogram Properties
Comparison of Histogram Preferences
Making a Bit Histogram plot
Plot Measurements
Overview
Plot Point Measurements
Plot Line Measurements
Statistics Measurements
Statistics Properties
Mark Statistic
Plot Marker Properties
Plot Notes Pane
Scatter plots
Scatter Plot command
Tutorial: Making a Scatter Plot of Measurements
Selecting Cells in a Grid Control
Pixel Series plots
Plotting a value through an image set
3-D plots
3-D Surface Plot command
3-D Plot Type Examples
3-D Z-Scaling Examples
Preferences
3-D Viewpoint
3-D Window Dialog
3-D Drawing Attributes
3-D Light Source
Surface Plot Z Limits
Contour plots
Contour Plot command
Contour Plot Properties
Contour Drawing Properties
Interactive Contour Plot command
Interactive Contour Properties
Contour Plot Smoothing
Copy & Paste
Example
Copying plot data to the clipboard
Pasting plots from the clipboard
Copying the window bitmap
Printing Plots
Overview
Properties
Overview
Printing Placement Properties
Printing Overlay Properties
Printing Heading Properties
Printing Text Properties
Calibrating Images
Selecting Source Images
Overview
Creating synthetic images
Trimming an image section
Adding metadata at File Open or Save
Modifying header keywords
Creating a Pixel Mask
Applying a Pixel Mask
Image Combining Strategy
Editing and Creating a Blemish Mask
Applying a Blemish Mask
File Event Scripting
Astrometric Calibration
Express Image Calibration
Bias Correction Properties
Dark Correction Properties
Flat Correction Properties
Cosmetic Correction Properties
Creating a Master Bias
Create Master Bias
Image Combining Strategy
Creating a Master Dark
Create Master Dark
Image Combining Strategy
Create Master Flat
Create Master Flat
Flat Frame Selection Criteria
Image Combining Strategy
Create Illumination Flat
Flat Correction Properties
Image Combining Strategy
Create Pixel Flat
Create Pixel Flat
Flat Correction Properties
Image Combining Strategy
Repairing Artefacts and Cosmetic Defects
Overview of Methods
Cleaning artefacts from an image set
Interactively Repairing Defects
Evaluating repair techniques using synthetic images
Blemish Masks
Creating and editing a blemish mask
Applying a Blemish Mask
Pixel Masks
Creating a Pixel Mask
Editing a Pixel Mask
Applying a Pixel Mask
Removing Stars from Images
Overview
Changing the aperture properties
Viewing data for template samples
Properties
Overview
Point Properties
Other Properties
Processing Images
Overview
Command Dialogs
Selecting Source Images
Image Types
Image Region Commands
Testing calibration strategies using synthetic images
Image Keys Pane
File Event Scripting
Adding metadata at File Open or Save
Creating an image list from keywords
Searching images for keyword values
Cosmetic Repairs
Interactive Repair
Interactive Repair Properties
Removing cosmic rays from an image set
Blemish Masks
Creating and editing a blemish mask
Applying a blemish mask
Pixel Masks
Creating a pixel mask from an image
Editing a pixel mask
Applying a pixel mask
Removing Stars from Images
Overview
Changing the aperture properties
Viewing data for template samples
Properties
Overview
Markers
Background
Sample Data
Combining Images
Combine Image Set
Combine Files
Image combining methods
Setting normalization preferences
Region Statistics
Aligning Images
Overview
Aligning on a point
Aligning on an extended object
Aligning using the WCS calibration
High Precision Registration command
Overview
Tutorial: Introduction to Image Registration
Example using Point Tracking
Image Registration Properties
Image Registration Properties Dialog
Resampling
Background
Image Registration Residuals
Marker Properties
Resampling Properties
Tracking Properties
Image Region Statistics
Overview
Estimators
Editing & Copying
Overview
Duplicating to a new window
Emptying the Clipboard
Math Commands
Overview
Arithmetic Operations
Change Pixel Type
Combine Image Set
Fit Background
Image Arithmetic
Normalize Image
Region Statistics
Value Arithmetic
Using Plug-ins
Geometry Commands
Overview
Rotating Images
Rotation Menu
Affine Transformation
Expand Image
Imbed Image
Mirror
Reverse
Rotate
Rotate by angle (from Image Toolbar)
Scale
Shift
Transpose
Cropping to specified bounds
Cropping to the Image Cursor
Cropping by a rectangle
Align Horizontal
Align Vertical
Commands for RGB data
Working with RGB Images
Applying a palette to the pixels
Converting to RGB
Converting to Grayscale
Converting to 16 bit Luminance
Converting to 8 bit Luminance
Removing color noise
Extracting channels
Making an LRGB Image
Making an RGB Image
Commands for Intensity data
Extracting byte planes
Converting the data type
Converting to RGB
Undo
Using undo
Filtering Images
Overview
Removing Extreme Pixel Values
Cosmic Ray Filter
De-speckle Filter command
Clip High Values
Clip Low Values
Rank Filtering
Rank Filter
Median Filter
Minimum Filter
Maximum Filter
Smoothing Image Details
Rectangle Filter
Elliptical Filter
Binomial Filter
Gaussian Filter
Block Average Filter
Block Sum Filter
Sharpening Image Details
High Pass Filter
Unsharp Mask
Maximum Entropy command
Maximum Entropy example
Enhancing Edges
Gradient Filter
Rotational Gradient Filter
Rotational Gradient example
Laplacian Filter
Miscellaneous Kernel Filters
Custom Filter Kernel
3x3 Custom Filter command
Extracting Sources from Images
Using the MExtract Module
Definitions of Extracted Properties
Running the Pipeline
Tutorial
Preferences
Properties for the Source Extraction Tutorial
Source Extraction dialog
Procedure page
Background page
Detect page
Filter page
Match page
Difference page
Post Process page
Post Processing Options
Centroid Properties (Source Extraction)
FWHM Properties (Source Extraction)
PSF Fit Properties
Aperture Photometry Properties
Variability Properties
Image Diagnostics and Calculations
Overview
Create Synthetic Image
Bit Histogram Plot
Calculate Airmass
Calculate Gain
Calculate Image Scale
Calculate Julian Date
Calculate Readout Noise
Using the Pro Script Module
Working with scripts
Using the Script Editor Window
Using the Script Manager
Editing script keywords
Save Window Position
Related Topics
Script Editor Toolbar
Script Editor View Menu
Script Editor Context Menu
File Event Scripting
Tutorial: Introduction to File Event Scripting

Mira Pro x64 User's Guide

Prev Page Next Page

Tutorial: Displaying an Image


This tutorial describes how to display an image and make some basic adjustments. To learn about opening multiple images in the same window and working with them, see Image Sets.

Opening an Image

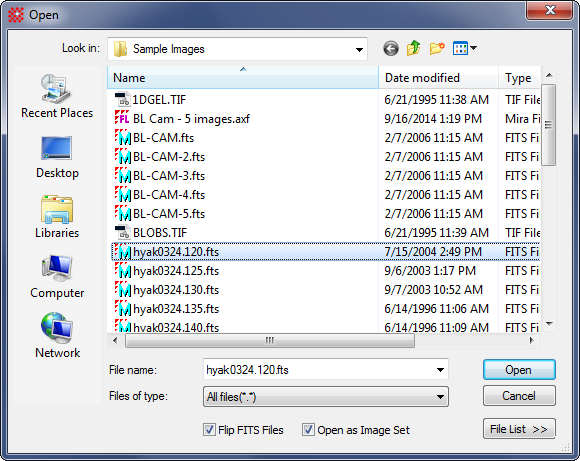
Start Mira in the usual way. Click the File command on the Menu Bar and then click [Open...] in the File menu. This opens the familiar the Open dialog shown below.

If you obtained a Mira installation that contains sample images, navigate to the folder <Documents>\Mira Pro x64\Sample Data. Otherwise, navigate to a folder containing one of your images and use it in the descriptions below.

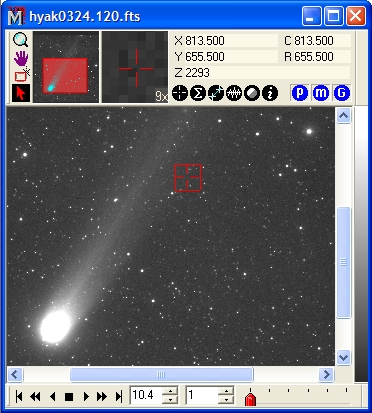
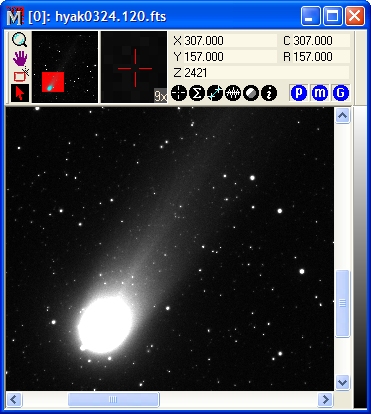
In the Open dialog, click on 'hyak0324.120.fts' to select it as shown, then click [Open]. An image is opened into an Image Window that looks like the one shown below. Note that the image appears small because it was scaled to fit the screen.

NOTE

If a FITS format image opens upside down, open the Open dialog and check the Flip FITS Images option, then re-open the image. This option can also be set on the General Properties page.


You might also use the File > Create Image Keyword List command to list image information such as columns, rows, filter,exposure time, etc., without having to display the images.

Adjusting the Image

Along the top of the Image Window is a command center called the Image Bar. Two live parts of the Image Bar are the two auxiliary image views and the Image Coordinate Display section. The auxiliary views show a thumbnail that indicates the currently visible region and a magnified view that tracks the mouse pointer. The Coordinate Display section also tracks the mouse pointer, displaying both column and row position in the image (C and R) as well as the pixel value Z, and the World Coordinates X, and Y. World Coordinates refers to Right Ascension and Declination. This image has no World Coordinate System (WCS) calibration so (X,Y) equals (C,R).

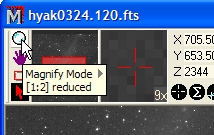
We now want to magnify the image. If the mouse has a thumb wheel, and the image window is active (on top; has focus), we can rotate the wheel to magnify the image. Otherwise, the quickest way is to use Magnify Mode. Move the mouse onto the button at the extreme top left corner of the window and let the mouse hover over the button. This is the Magnify Mode button. If you click it, Mira changes into Magnify Mode in which left mouse clicks on the image magnify it at that point. If you let the mouse hover over the button, a tooltip pops up as shown below.

Using the Image Cursor

In the previous figure, notice that the image shows a large red square with a small central crosshair. This is the Image Cursor, which is a resizable tracking cursor used for defining positions and rectangular regions on the image. The Image Cursor is used by a number of commands and interactive tools. The Image Cursor expands or shrinks as you change the image magnification (if you have not already noticed this, try changing the image magnification while watching the image cursor). This behavior shows that the image cursor is connected to the image's pixel coordinate system rather than the computer screen. The edges and center are always reported to Mira internally as actual (fractional) pixel coordinates. Now, we will change to Cursor mode to be able to adjust the Image Cursor. Click to switch to Cursor Mode. (As usual with cursor command modes, you switch out by clicking to return to Roam Mode.) Note that you can also change modes by right clicking on the image to open the Image Context Menu instead of the button commands.

Tip

Mira also provides a shortcut for changing between Cursor mode and Roam mode: the Ctrl+A keystroke. This accelerator toggles between these two modes or toggles into Cursor mode from any other mode.

Alternatively, you can move the Image Cursor without switching into cursor mode. Simply hold down the [Shift] key and click the mouse on the target position.

To move the Image Cursor in Cursor Mode, simply click on the image. To move it in another mode, hold down the [Shift] key and click the mouse on the target position.

The Image Cursor responds to "[left] mouse button down" by locking onto the mouse pointer, wherever it may be. Thus you can position or drag the Image Cursor by having the mouse button down. To resize the Image Cursor, move the mouse pointer over an edge or corner to see the pointer icon change to a double arrow. Then mouse down on that point and stretch the Image Cursor as desired. These moving and stretching operations work only while in Cursor Mode. You should use these actions to position the Image Cursor on a place of interest in the image. If the Image Cursor is lost somewhere outside the visible portion of the image, say when it is highly magnified, just enter Cursor Mode and mouse down somewhere on the image. That will relocate it to the point where you clicked. You can also position the Image Cursor at an exact coordinate (pixel or world) using the Go To Coordinates command in the Image Window > Coordinates menu or the Image Context Menu. The Go To Coordinates window stays open so you can dock it near the edge of the screen to use as needed.

Adjusting the Image Palette

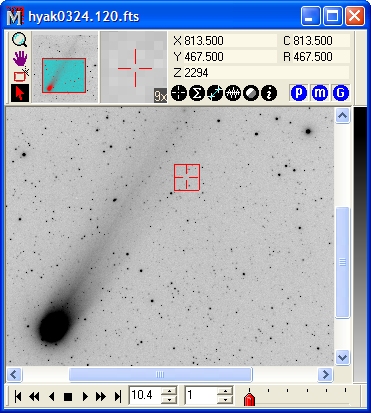
Let's play with the Image Palette. The right border of the Image Window shows the relationship between image "intensity" (or intensity, pixel value, count, ADU, etc.) and the color assigned to the view through the Image Palette. This region, which looks like a Grayscale ramp in these figures, is called the Image Color Map. The Color Map shows the current palette. To change the palette, move the mouse pointer onto the Color Map "hot zone". The pointer will change to a red/blue, yin/yang symbol to indicate that palette commands are available by clicking the mouse. Another type of display adjustment is made using commands in the View > Transfer Function menu. The picture below shows a negative Grayscale image which was made by inverting the contrast of the Grayscale palette.

Other palette adjustment commands:
  • To invert the palette and produce a negative image as shown above, use the View > Palette > Invert command in the main menu.

  • To adjust the palette contrast, brightness, and gamma, mouse down on the Color Map and drag the pointer around the screen.

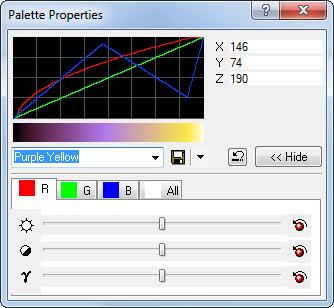
  • To view palette changes, open the Palette Pane or open the Palette Properties dialog. You can work with palettes in greater detail using this dialog.

  • To reset the palette to its default settings, right double click on the Color Map.

A transfer function is a "rule" that describes how to "slice" the intensity range of an image into some number of levels for display. To each level is applied a color (or gray shade) entry from the palette. The transfer function is applied to intensity (i.e., non-color) images. A palette is applied to both intensity and color images. By changing either the transfer function or the palette assignments, you can change the way an image is displayed. Neither the transfer function nor palette affects the actual pixel values; they are both just display enhancements. You can prove this to yourself by adjusting the palette and noting the pixel values as you roam the mouse pointer around the image—there is no change in values despite the change in appearance. All measurements, processing, and plotting are also independent of transfer function and palette settings. For more information, see Image Palettes.

On the right border of each image window is a vertical bar of Grayscale or color, called the Color Map, or "Color Map" which is a hot area that takes action upon mouse dragging, double clicking, and right double clicking. Now, double click on the Color Map to open the Palette Properties dialog. Underneath the palette graph is a drop box containing the names of different palettes:

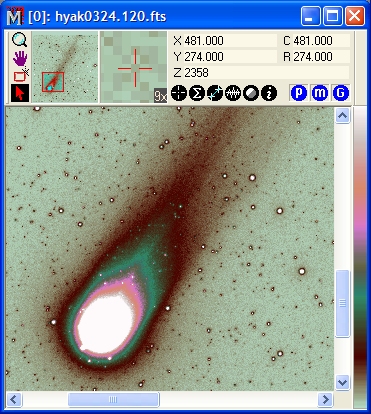
This drop box and its buttons to the right are called a Profile Control. The Grayscale palette is the default when an image is opened, and it performs a direct mapping of gray shade or color assignments to the image values. You can also apply false colors to the transfer function levels using a “pseudocolor” palette. Select the name 'Colorful' from the list as shown above. All images change to look like that below. You can keep the Palette       open to change or adjust the palette, even while the images are animating. The Palette Properties attaches itself to the properties of the current image window (the one on top, or having focus).

Pseudocolor allows certain image features to be enhanced at the expense of others and represents a powerful say of visualizing images. In the drop list, select a different palette name and notice how the image window having focus changes to apply it immediately. You can adjust the contrast and brightness as described in the previous section and watch the palette change.

Related Topics

Contents

Tutorials

Getting Started

Image Windows

Plotting commands

User Interface


Mira Pro x64 User's Guide, Copyright Ⓒ 2023 Mirametrics, Inc. All Rights Reserved.