|
|
Working With Toolbars The Mira user interface contains two types of toolbars: Top-level Toolbars and Window toolbars. These two types of toolbar operate commands at different levels of the user interface:
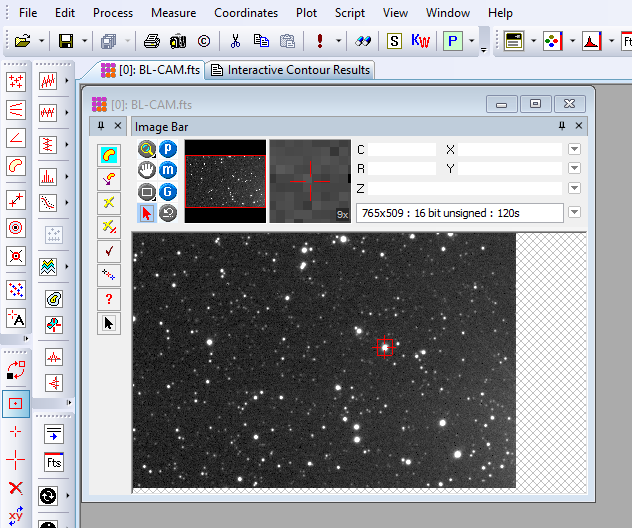
The screenshot below shows both top-level toolbars and a window toolbar.
Top-level ToolbarsTop-level Toolbars work with view windows such as an Image Window. The toolbar applies its functionality only to the top-most window. If a toolbar button is not associated with the type of data in the top-most view window, then the button is disabled. For example, if a Plot Window is made top-most, then most of the buttons the Top-level Toolbars will disable because their command does not work with a Plot Window. Those buttons will enable when an Image Window is made top-most. All of the main toolbars, as well as the main menu, can be moved to different borders of the Mira application window. They can also be floated free of all borders. The picture below shows all of Mira's top-level toolbars displayed in vertical format along the left application border. In this example, all toolbar buttons are enabled (not grayed), meaning that they either operate a function for the image window shown, or they operate a global command that does not use an image window. If, for example, a Plot Window were the top-most view window, then most of these buttons would be disabled as they apply to commands for Image Windows. Toolbar Configuration and VisibilityThe top-level toolbar configuration can be changed in several ways:
In addition to manual button assignment, the buttons of top-level toolbars will automatically disappear or reappear as the toolbar shrinks or expands when the main Mira window is resized. In the picture below, the Palette Pane button appears at the bottom of the fully expanded toolbar on the left but disappears from the shrunken toolbar on the right.
If the toolbar is unable to show all buttons, a small double arrow appears on the expanded toolbar border as shown in the right toolbar fragment above. If a toolbar does not show all assigned buttons, you can enlarge the Mira window, reassign the buttons on the toolbar, or try dragging the toolbar between vertical and horizontal orientations. Top-level Toolbars
Buttons in a top-level toolbar operate several kinds of commands which have a user interface as described in the table below. These interfaces include simple button commands, docking panes, Window-level toolbars, drop-menus, and regular button commands. In general, it is not clear beforehand which kind of interface is associated with the button, but Mira provides guidance in a status message which appears when you hover the mouse over the toolbar button. Hovering over the button causes a short description of the button's command to appear in the status bar at the bottom of Mira's main window. Buttons that open docking panes have their own hint, as described in the following table:
Window ToolbarsWindow Toolbars operate complex procedures, or "packages", that apply to a specific window. Most window toolbars are actually Docking Panes which may be shown, hidden, or tabified. Window toolbars are opened and closed using a top-level toolbar buttons and menu command. To shrink the docking pane toolbar to a tab ("tabified" configuration), use the stick-pin on its title bar. To close it altogether or re-open it, use the top-level toolbar button or menu command. Window toolbars operate independently for each window. For example, the Aperture Photometry Toolbar operates the aperture photometry package, and multiple Image Windows may be open for doing aperture photometry independently in each window. Since these toolbars are window-specific, they dock to the border of their parent window. The screenshot at the top of this page shows the Region Measurements toolbar docked on the left border of an image window. Notice that the top button is highlighted, indicating that the toolbar is in active marking mode. A window having an active toolbar mode shows a unique mouse pointer to indicate that the mode is active. To disable an active mode and return to the normal mouse pointer, click the arrow button on the toolbar. Related Topics
Mira Pro x64 User's Guide, Copyright Ⓒ 2023 Mirametrics, Inc. All
Rights Reserved. | ||||||||||||||||||||||||


