|
Cosmetic Correction Properties
The Cosmetic Correction Properties methods
are used by
Express Image Calibration to apply final
cosmetic corrections to images. These corrections involve removing
artifacts and trimming the images to final size.
Select Methods
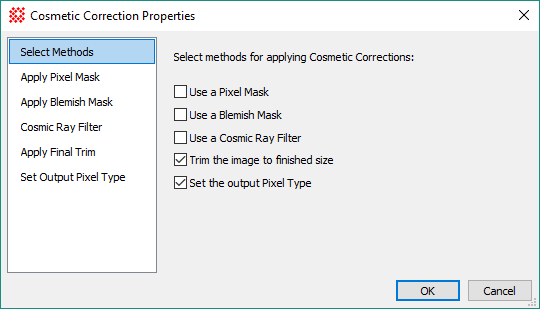
Select the cosmetic correction method by selecting
check boxes on the Select Methods page. Be sure to configure
each of selected method using properties on its method page, as
described below.
Apply Pixel Mask
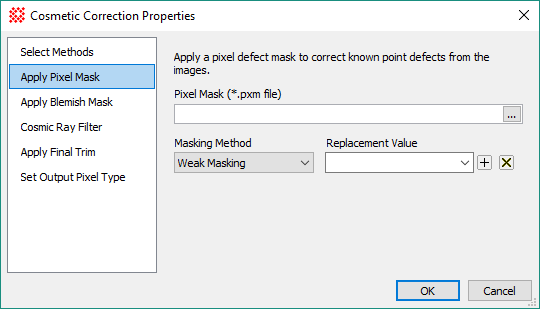
Use this method to remove single pixel artifacts
such as "hot" and "cold" pixels. The location of known deviant
pixels is defined by a file known as a "pixel mask". The pixel mask
specifies coordinates of the deviant pixels; the mask may be
created by editing a plain text file or by using the
Create Pixel Mask command. A non calibration form of
this command is
Apply Pixel Mask.
Apply Pixel Mask Properties
|
Pixel Mask (*.pxm file)
|
This field specifies the file containing the pixel
mask. Click [...] to open a file
browser for selecting the pixel mask file.
|
|
Masking Method
|
Select the method to use for correcting the
artifacts. The options comprise a range of strength in removing the
artifact. Usually, choosing the weakest acceptable setting gives
the best results.
|
|
Replacement Value
|
Enter the numerical value to assign the pixel when
Masking Method = Set to Value. The
other settings determine the replacement value from the values of
pixels around the artifact.
|
Apply Blemish Mask
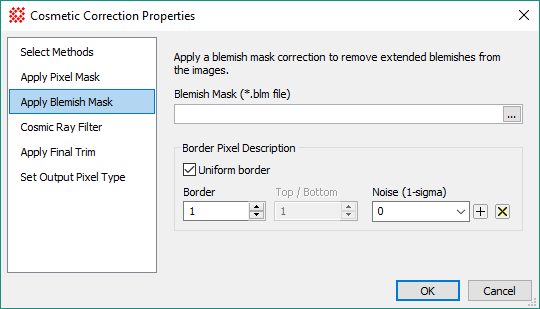
Use this method to correct remove multi-pixel
artifacts, such as small spots, columns, and rows. Blemish regions
are specified using the column and row limits of a rectangular
region encompassing the defect. Pixels inside the rectangle are
replaced with Gaussian random noise. Non calibration forms of this
command are
Edit Blemish Mask and
Apply Blemish Mask.
|
Apply Blemish Mask Properties
|
|
Blemish Mask (*.blm file)
|
This field specifies the file containing the
blemish mask. Click [...] to open a
file browser for selecting the pixel mask file.
|
|
Border Pixel Description
|
These properties determine the size of the border
where "good" values are sampled around the deviant pixels.
|
|
 Uniform Border Uniform Border
|
Check this box to use a border of uniform size
around the blemish. When checked, only the single Border property is needed to specify the width of
the region.
|
|
Border (Left/Right Border)
|
When Uniform Border
is checked, this property specifies the width of the border region
on both the left/right sides and top/bottom sides. When not
checked, it specifies the size of the border on the left and right
sides of the deviant pixel.
|
|
Top/Bottom Border
|
When Uniform Border
is checked, this property is unused. When not checked, it specifies
the size of the border on the left and right sides of the deviant
pixel.
|
|
Noise (1-sigma)
|
Specifies the 1-sigma value for Gaussian random
noise which is used for replacing pixels in the blemish region.
|
Cosmic Ray Filter
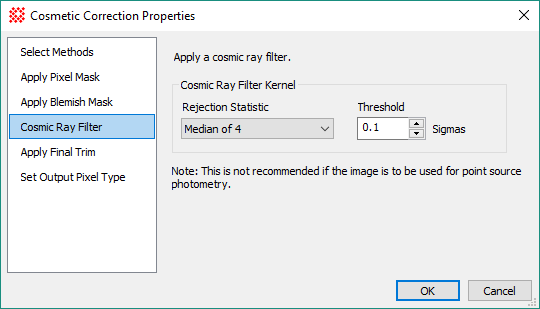
Use this method to apply a filter that removes
cosmic rays from the image. The properties are defined the same as
those used in the
Cosmic Ray Filter command. Since this filter clips
the values of "hot" pixels in a non-linear way, it usually should
not be used when the final images are to be used for point source
photometry.
|
Cosmic Ray Filter Properties
|
|
Rejection Statistic
|
Selects the rejection statistic used for detecting
and rejecting a pixel value if it is too extreme in comparison with
neighboring values. The rejected pixel is replaced with the
statistical value if its value exceeds the statistical value by
Threshold number of sigma's. The
statistical alternatives are as follows:
Median of 4
Compares the pixel at the center of the kernel
with the median value of 4 closest neighbors.
Median of 8
Compares the pixel at the center of the kernel
with the median value of 8 neighbors in a square centered on the
pixel.
Median of 16
Compares the pixel at the center of the kernel
with the median value of 16 closest neighbors.
Median of 24
Compares the pixel at the center of the kernel
with the median value of 24 neighbors in a square centered on the
pixel.
Mean of 4
Compares the pixel at the center of the kernel
with the mean value of 4 closest neighbors.
|
|
Threshold
|
Specifies the detection threshold in terms of
locally calculated sigma's.
|
Apply Final Trim
Use this method to trim the image to a finished
size. This is often used to remove column and row overscan regions
after they are used for column and row bias corrections, but the
method may be used to trim the image to any rectangular size. There
are two ways to identify the rectangular trim region: 1) using a
keyword in the image header, such as TRIMSEC, or 2) by specifying
exact column and row limits. The non-calibration version of this
command is
Trim Image Section.
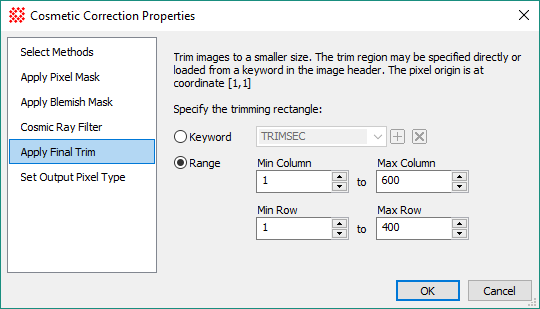
|
Apply Final Trim Properties
|
|
 Keyword Keyword
|
Enter the keyword that contains the column and row
bounds of the trim region. The keyword TRIMSEC is fairly common but DATASEC is also popular. A section keyword has
the format [c1:c2,r1:r2].
|
|
 Range Range
|
Select this option to specify the exact column and
row limits. Remember to enter 1-based pixel coordinates.
|
|
Min Column
|
Enter the minimum column of the trim region.
|
|
Max Column
|
Enter the maximum column of the trim region.
|
|
Min Row
|
Enter the minimum row of the trim region.
|
|
Max Row
|
Enter the maximum row of the trim region.
|
Set Output Pixel Type
Use this method to change the output pixel type to
a specified value. Mira promotes the pixel values to a type that
hold the numerical precision of the processing operations. However,
you may wish to force the final output images to have a specific
pixel type. For example, "16-bit unsigned" integer type images may
be promoted to "64-bit real" type images during calculation. To
change the final calibrated images to use the original "16-bit
unsigned" pixel type, set the type on this page.
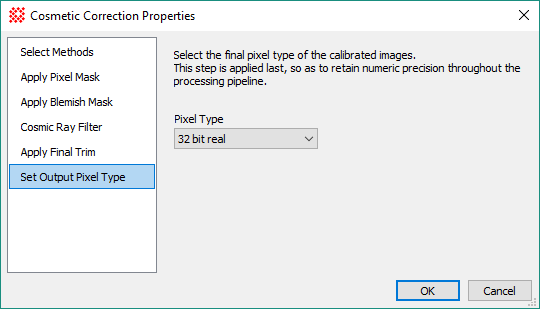
|
Set Output Pixel Type Properties
|
|
Pixel Type
|
Select the final pixel type from the list of
options.
|
Related Topics
Calibrating Images
Express Image Calibration
Create Pixel Mask
Edit Blemish Mask
FITS Keywords
Repairing Artifacts and Cosmetic Defects
Mira Pro x64 User's Guide, Copyright Ⓒ 2023 Mirametrics, Inc. All
Rights Reserved.
| 


