|
Using the Boost Transfer Function Option
This topic uses examples to illustrate how the
Boost
transfer function option enhances contrast in crowded
ranges of image brightness. This is useful for imaging applications
in which important detail is compressed into a narrow range of
intensity. The first example shows how Boost enhances faint
structure in astronomical images where the object merges into the
background noise. The second example shows how boost reveals subtle
variations in pixel value around the mid-range of an image that has
an inherently compressed range of value.
Boost Benefits
Boost is generally useful for visually evaluating
all the information held in the image by boosting contrast in
crowded areas of the intensity histogram. Its benefits include the
following:
-
Boost works with all other transfer function
parameters.
-
Boost works on intensity (non RGB) images of all
pixel types, from 8-bit integer to 64-bit real.
-
Boost can be applied as a
default transfer
function parameter or after displaying the image.
-
Boost can be toggled on/off after an image is
displayed, for example, to identify some particular weak feature
without keeping the image in a boosted state.
-
The Boost algorithm is very fast.
Using the Boost Option
The Boost algorithm
identifies compressed ranges of pixel value and expands them into a
greater range of grayscale or pseudocolor in the image display.
This process usually does not saturate large regions of bright or
dark pixel values. In astronomical images, contrast expansion is
beneficial for revealing subtle details where the object merges
into the sky background. The most striking improvement often
results from applying Boost to a
Gamma or Linear stretch. The results are identical
regardless of whether it is applied to existing transfer function
parameters or if the other transfer function parameters are changed
whileBoost is enabled. It is important
to experiment by viewing images having varying content and changing
Boost along with other transfer function parameters.
M42: Enhancing Nebulosity near the Sky Level
This example uses the Boost option to reveal faint
nebulous structures in and around the region of the Great Orion
Nebula, M42. This field shows a great deal of weak nebulous
structure that merges into the sky background. The ability to
distinguish subtly changing image features is vital in many imaging
applications where important detail is compressed into a narrow
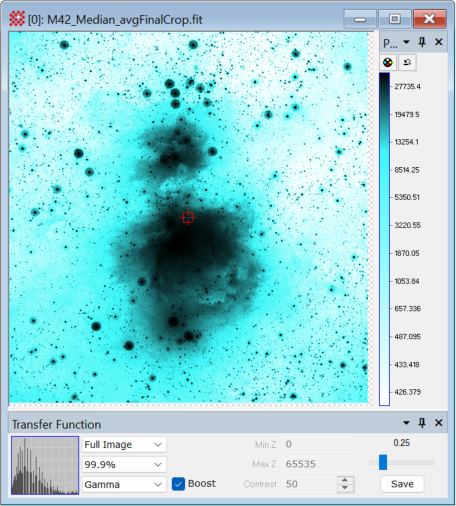
intensity range. The image used below shows the Orion Nebula, M42,
in a calibrated 32-bit real image that is the calibrated and
combined result of 33 x 10-second CCD images acquired with the
20-inch F/1 Baker-Nunn Schmidt camera at Rothney Observatory of the
University of Calgary. The star halos are an artifact of the
original images. Image courtesy of Dr. Phil Langill of the
University of Calgary.
|
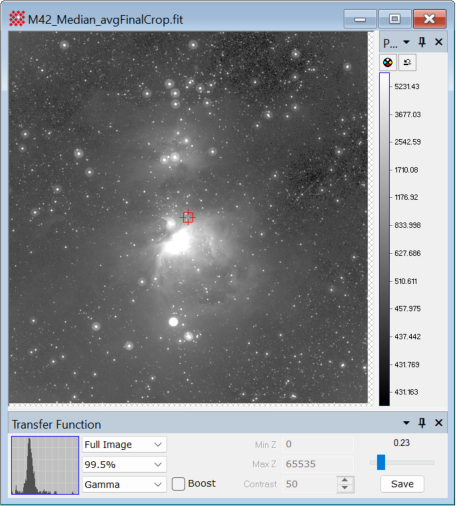
Figure 1: Image centered on the nebula M42
displayed with a strong gamma stretch and auto-scaled with a wide
range of 99.5%. Note that this stretch and scaling lifts the
background above black to show faint structure near the sky
level.
|
|
|
|
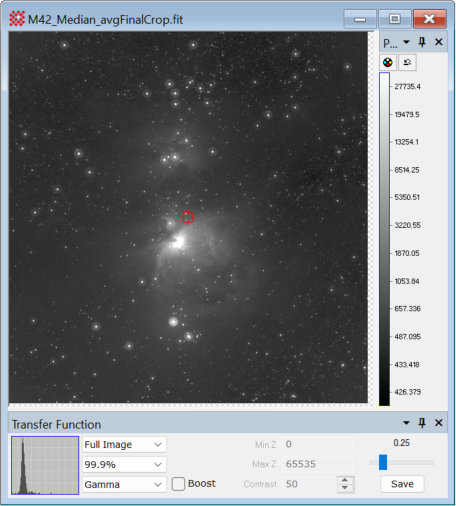
Figure 2: Image from Figure 1 after changing the
transfer function range from 99.5% to 99.9%. This shift the
background toward black but obscures some faint nebulosity near the
sky level.
|
|
|
|
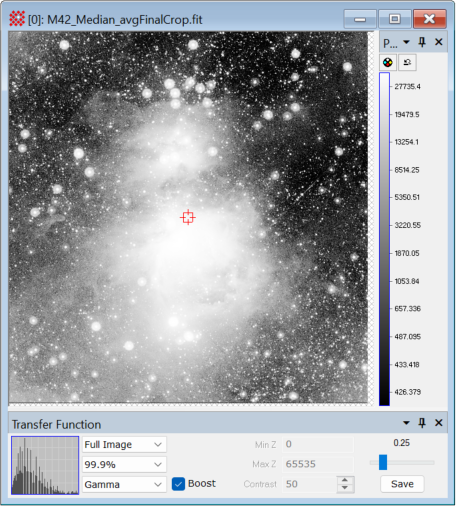
Figure 3: Image from Figure 2 immediately after
checking the Boost option. This applies
the Boost algorithm to the current transfer function parameters.
Notice the great enhancement in faint structure while retaining a
smooth gradient in the brighter regions. The enhancement may be
reversed by unchecking the option.
|
|
|
|
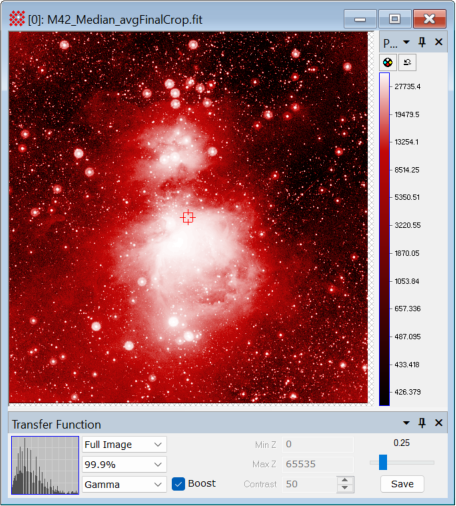
Figure 4a: The image from Figure 3 after using the
Palette Properties dialog to apply a red pseudocolor
palette. Pseudo color can help reveal delicate structures and
separate details by pixel value. In this example, it helps separate
weak features of M42 from the true background which remains
black.
|
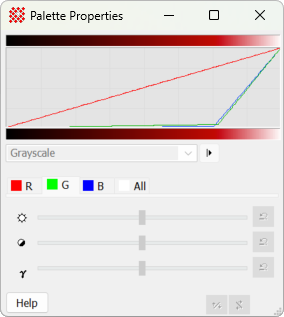
Figure 4b: The
Palette Properties dialog showing the red pseudocolor
palette used in Figure 4a. This palette, named "Red + White," is
included with the Mira installation.
|
|
|
|
|
Figure 5: Inverting the palette in Figure 4b can
often be used to make faint details easier to distinguish by using
a white sky background.
|
|
|
Enhancing Mid-range Structure in a "Flat" Image
The Boost algorithm is also helpful for enhancing
midrange structure in images besides astronomical objects. The
images below show a CCD illumination flat created from 5 R-filtered
images. The 5 streak artifacts result from creating the master flat
using mean-combining rather than median-combining. Below are three
views of this illumination flat with different transfer function
settings.
|
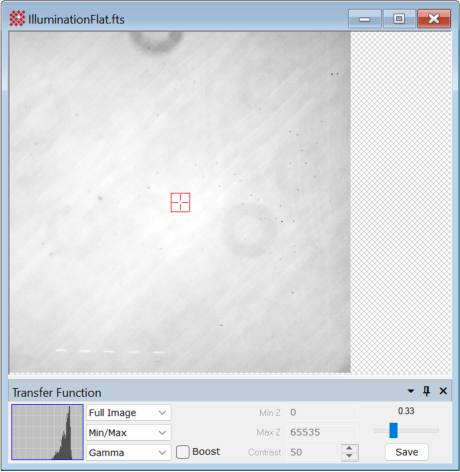
Figure 6: The picture below shows a "soft" view of
the illumination flat. The Min/Max transfer function scales the
image data to the black/white range using the minimum and maximum
values in the pixel histogram. The darkest pixels shown are not
black because this method keys on the absolute lowest and highest
pixels for assigning true black and white. However, it shows the
broad span of image brightness without being harsh. Notice a hint
of angled structure in the chip sensitivity, probably resulting
from back-thinning. These patterns can be better investigated using
other settings or the Boost option.
|
|
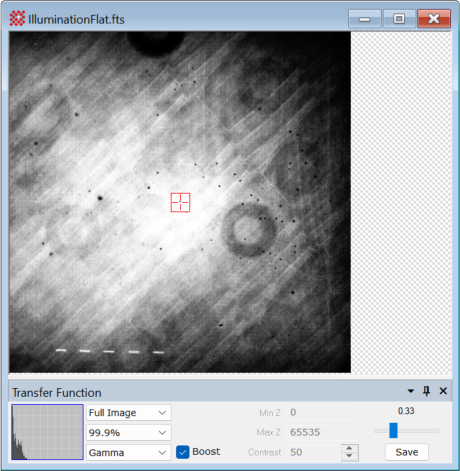
Figure 7: Switching from Min/Max (above) to 99.9%
(below) stretches the mid-range because it excludes the most
extreme 0.1% of pixel values for computing the black/white
conversion. Applying Boost to this or the previous view enhances
the mid-range structure.
|

|
Figure 8: The image below is enhanced using Boost
to create a more informative view of the patterns near the
mid-range. Of course, this is a relatively harsh view, but it shows
everything significant in the image. Clicking the Boost checkbox
once more toggles back to the original view (above).
|
Related Topics
Transfer Functions
Choosing Transfer Function Properties
Transfer Function Pane
Transfer
Function Properties
Transfer Function Popup Menus
Mira Pro x64 8.67 User's Guide, Copyright Ⓒ 2023 Mirametrics, Inc.
All Rights Reserved.
| 
