Scripting Example: Applying a Filter to an Image
The
example below illustrates a simple script. A simple version is shown in
Example 1.
To see the current example further enhanced, see Example 3.
Script
Example 1
demonstrated a "global script" which ran independent of an image already
displayed. This example shows a "class script" that runs from a
Mira image window — that is, from a Mira class. This type of script
uses the data from that class. Here, the script
creates a simple filter kernel and applies it to an image set (i.e., an image
stack) displayed in a window. The script could call a function to select one of the images,
but instead we process all images in the window. This script uses the
provided CMatrix class to create the filter kernel on-the-fly. In a more general form of this
script, we might have it display a list of other filters stored in their own
files, from which the user would pick the filter to apply.
|
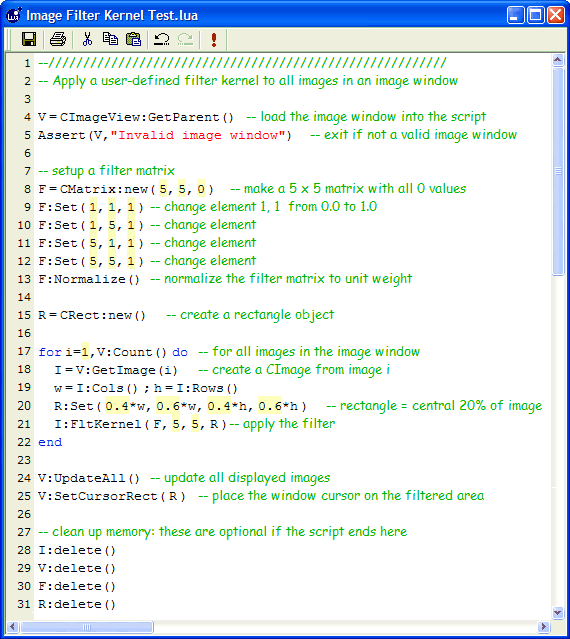
 In the script
shown at left , the image window
is first attached to provide the images to be processed. Next, the filter
kernel is defined and a rectangle is setup for processing only the central
20% of the image. Then each image displayed in the Image Window is processed in a
loop. Finally, the images are re-displayed to show the changes. The script is shown in a full size screen capture of the Mira
Script Editor window; however, you don't need to open the script into an
editor just to execute it.
Larger view In the script
shown at left , the image window
is first attached to provide the images to be processed. Next, the filter
kernel is defined and a rectangle is setup for processing only the central
20% of the image. Then each image displayed in the Image Window is processed in a
loop. Finally, the images are re-displayed to show the changes. The script is shown in a full size screen capture of the Mira
Script Editor window; however, you don't need to open the script into an
editor just to execute it.
Larger view
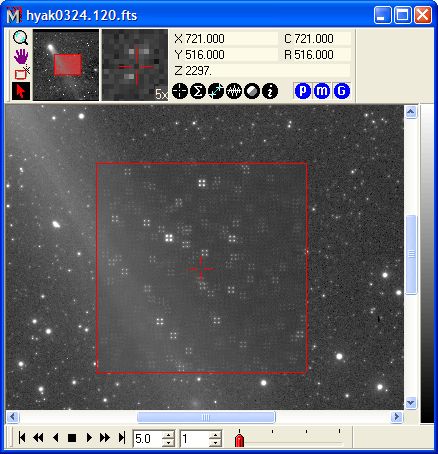
 Next,
we run the script. With 4, 1k x 1k images of 32 bit
real data type displayed in Mira. At left is the result of executing the script: The filter defined in the script
splits each point into the corners of a 5x5 matrix, as clearly shown in this
Mira screen capture]. As described above, the filter is applied inside the image
cursor (red square).
Larger view Next,
we run the script. With 4, 1k x 1k images of 32 bit
real data type displayed in Mira. At left is the result of executing the script: The filter defined in the script
splits each point into the corners of a 5x5 matrix, as clearly shown in this
Mira screen capture]. As described above, the filter is applied inside the image
cursor (red square).
Larger view
|
|
 Previous Example
Next Example
Previous Example
Next Example 
|