In Example 2, we created a short, but capable script that applied a user defined filter kernel to 1 or more images of an image set displayed in an image window. The particular filter kernel is not necessarily an extremely useful one, but it produces a result that is readily seen on the displayed image. In this example, we simplify the same script and also extend its capabilities. Several changes are made to greatly enhance its versatility without adding much complexity. Here are the enhancements:
- The filter definition was placed in a separate file that is included by the script at run-time.
- Two more filters were added.
- The filter choices are shown to the user in a drop-down list box, from which the desired filter is selected.
- Filter definitions are stored in a simple, on-the-fly data structure for use in the main script.
- The new design is extensible, allowing new filter kernels to be implemented rapidly and without changing the main script.
Running the Script
![]() When
the user runs the new script, they are immediately shown a dialog box
requesting them to select a filter from a list, as shown in this dialog.
When
the user runs the new script, they are immediately shown a dialog box
requesting them to select a filter from a list, as shown in this dialog.
![]() We could immediately click [OK]
and select the default item. Instead, we click the down arrow to view a list
of filters:
We could immediately click [OK]
and select the default item. Instead, we click the down arrow to view a list
of filters:
 We select item 2, then
click [OK] to accept it and dismiss the dialog. The result is like in
the previous example.
Larger view
We select item 2, then
click [OK] to accept it and dismiss the dialog. The result is like in
the previous example.
Larger view
So, other than adding a list box with 3 filter choices, what else has changed from Example 2? Perhaps the most important change is that we have created a framework that allows the script author to implement any number of filter kernels simply by adding their description to an include file according to a simple recipe.
Behind the Scenes: Using an Include File
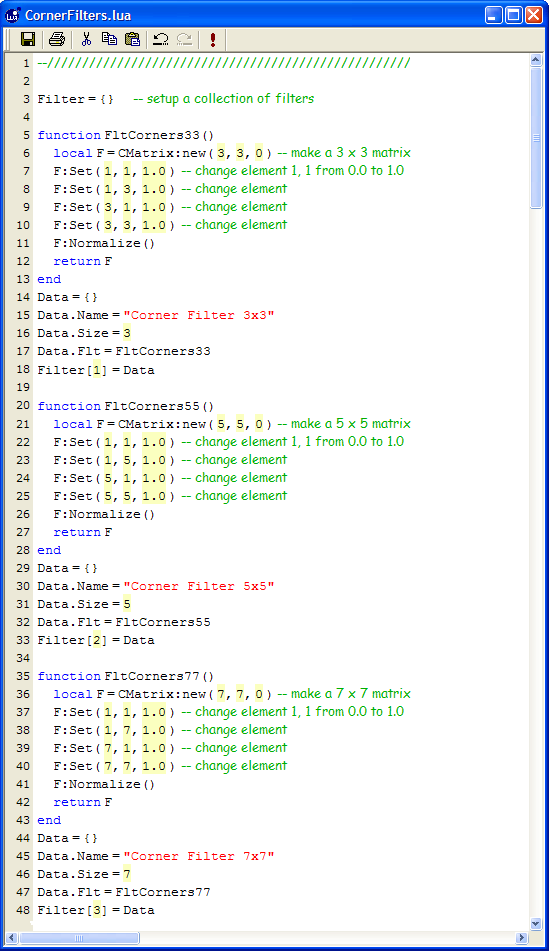 The first change to the script of
Example 2
is to move the filter definitions into a separate file that is included by
the script at run time. This screenshot shows our new filter
definition file. Below, we describe how it works. Larger view
The first change to the script of
Example 2
is to move the filter definitions into a separate file that is included by
the script at run time. This screenshot shows our new filter
definition file. Below, we describe how it works. Larger view
In this script, we first declare a table (a data structure to be filled-in) named
Filter, using the declaration Filter={}. Then, for each filter, we define a function and add this function and other filter properties to another table named Data. Finally, to complete our implementation of the filter, Data is added to Filter using the [] syntax. This makes Filter an array we can access using a subscript. After this new file is included by the main script, the script can access any number of filters as Filter[1], Filter[2], Filter[3], and so on. To define more filter choices, simply repeat the protocol shown above in lines 7 through 20.
The Revised Script
 The main script is shown
at left.
Larger view
The main script is shown
at left.
Larger view
On line 6, we include the filter definition file, which is named Include\CornerFilters.lua. On lines 8 and 9, we attach the parent window that called the script and, to be safe, test that the window is actually an image window. Lines 12 through 17 setup a dialog box containing a drop-list. The script creates a list of all filters that were defined in the include file, specifies the dialog labels, and sets item 1 as the default — compare these few lines of code with the dialog boxes shown above. Line 18 tests if the user clicked [Cancel] to abort the script. Finally, on lines 22 through 26, the script attaches the displayed image, gets its dimensions, and applies the filter to the central 20% of its area. If no rectangle were defined, the default is to process the entire image.