Copyright © 1998. Mirametrics, Inc. All Rights Reserved.
Overview
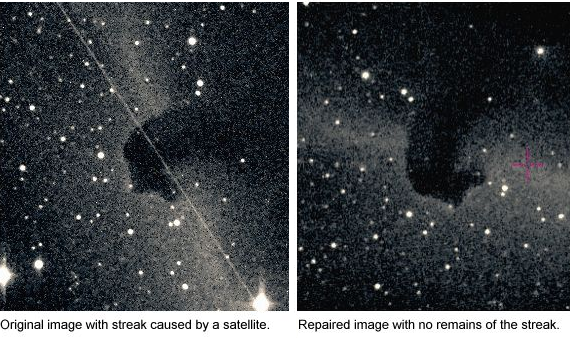
This Tech Note describes a method for removing a streak artifact from a single image (see the picture below). If we had 3 or more images of the same field, the images could be registered and then median combined to remove the streak. This would work because the trail would appear in only one of the images, and would therefore be rejected by the median pixel combining method. With just one image, however, we can't use this method. To make the problem worse, atmospheric turbulence, or "seeing", makes the trail fuzzy rather than a sharp line.
One way to remove the satellite trail is to use a bad pixel "zapping" function to replace each pixel with some more reasonable value However, this would be quite impractical with so many pixels in need of repair! Mira's Blemish Repair function is designed to automatically repair bad columns, rows, and rectangular regions. But what do we do if the defect runs diagonally rather than along a column or row? This Tech Note describes a procedure that successfully corrects the defect in this image.
Repair Procedure
The procedure given here applies to using Mira software. The repair procedure involves two Mira functions, Rotate about Center and Blemish Repair:
- Display the image and use the image cursor to mark the endpoints of the streak. From this, calculate the angle of the streak relative to the horizontal. Take the opposite sign of the angle and enter it into the Rotate about Center dialog. Click “OK” to rotate the image in the opposite direction. This makes the streak horizontal, along rows.
- Open the Blemish Repair command. On the displayed image, use the cross hair to determine which rows are covered by the trail. In this case, the defect covers 3 rows. Enter this row range into the dialog (if the streak didn't cover all columns of the image, we could also specify a column range to be repaired). This function replaces all pixels inside the specified region with (hopefully) more reasonable pixel values. The Blemish Repair command can also add random noise to the repaired pixels to mimic the noisy appearance of their surroundings. The amount of noise to add depends on the standard deviation in the image. Using the image cursor, outline a statistics region on the nebulosity near the streak. Click the menu command or toolbar button to compute the Statistics inside the box. We are interested in the standard deviation from the table of results; enter this value into the Blemish Repair dialog and click “OK” to repair the streak.
- If there were any bright pixels remaining after step 2, we could load the Interactive Repair toolbar and "zap" the bad pixels one by one. However, in this particular example, the repair works so well that we do not need to work on individual pixels.
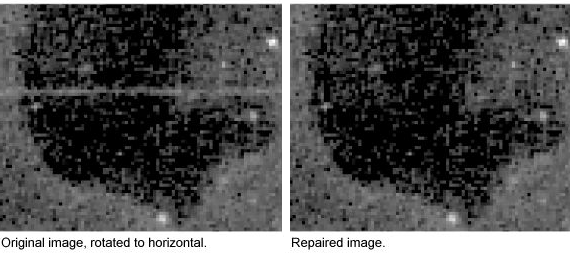
Sometimes, automated pixel repair doesn't work as well as we would hope, but the result here is quite satisfactory. We were fortunate: the fact that the original image is quite noisy actually improves the blending of repaired pixels with their neighbors. A close-up of the repaired region is shown in the second pair of images, below. Note that the same procedure, but without image rotation, is also used for repairing "bleeds" on bright stars.
The panel below shows magnified views of the "before" and "after" versions of the image that was repaired. Looking only at the right hand "after" image, can you tell which rows were repaired?