Removing the Mira Installation
This brief describes how to manually remove a Mira installation from your computer. This may be necessary before reinstalling the same Mira product having the same version number. In this case, Windows blocks the normal installation process based on the Mira Setup program.
The procedure below uses the Windows Programs and Features applet to manually uninstall Mira. The procedure is described using Windows 10 but is similar for other recent Windows versions such as Windows 11.
-
 Open the
Windows menu from the Windows icon at the lower left corner of the
Windows desktop.
Open the
Windows menu from the Windows icon at the lower left corner of the
Windows desktop. - In the Windows menu, locate Control Panel and open the menu of options. Far down the list, select Programs and Features as shown at right. This opens the Programs and Features window.
- In Programs and Features, notice the long list of installed programs.
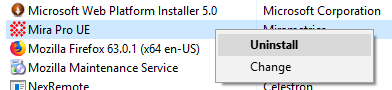
Navigate to the Mirametrics entry and select the target Mira version to uninstall, as shown in
the example below for the discontinued application "Mira Pro UE".

- Right-click on the target Mira version to open its action menu as shown
below. Click Uninstall.
- After clicking Uninstall, continue answering questions to complete the removal process.
- After the Uninstall completes, the target Mira installation has been removed from your computer.