|
|
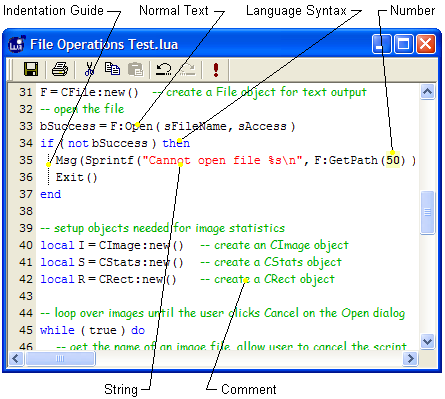
Using the Script Editor Window This topic is also included in the Mira User's Guide. To create and edit scripts, Mira integrates a Script Editor derived from the Scintilla Source Editing Component. The editor provides context highlighting as well as full editor functionality such as cut/copy/paste, line numbering, formatting, etc. Context highlighting uses different formatting such as fonts and color to display different aspects of the script syntax. The Script Editor also can execute the displayed script, with one important exception. To execute an open script, click the [!] button on its local toolbar, use the equivalent button on Mira's Main Toolbar, or use the Script Manager. However, there is one significant difference between the [!] button on the two toolbars: Scripts that access the top-most image window using the CImageView: Attach method do not work when executed from the [!] button on the Script Editor. The reason for this lies in the issue of which window is the top-most window. When you click [!] on the Script Editor, then the Script Editor window—and not the target image window—is the top-most window, hence the target image window cannot be attached by the script. Scripts using the CImageView: Attach method must be executed either from [!] on the Main Toolbar or from the Script Manager (with the target image window being the top-most window). Scripts that do not use CImageView: Attach may be executed using any of the 3 methods. The picture below shows a typical script displayed in the Mira Script Editor. In this script you can see various elements of the Lua language and Scintilla formatting styles available in Mira. The various format styles are labeled. These are the default settings for the Pro Script module but you can alter them at any time.
The toolbar on the top margin of the Script Editor
has buttons for common actions, including Menu CommandsWhen the Script Editor is the active document window in Mira, it loads its own menu bar containing relevant commands. Many of the commands in these menus are are common to all text editors, such as cut, copy, and paste commands. However, there are other features that may be new to you. These potentially new features are described in the following table. View Menu Features
Syntax StylesThe elements of a script include regular text for function calls, values, etc., as well as keywords of the Lua language, comments, and strings. Each of these syntax components may be highlighted to make it easier to distinguish from the other components. The Script Editor processes each character you enter and formats it accordingly if it matches one of the syntax rules. For example, when one dash, -, is typed, it appears as regular text. But typing a second dash to make '--' begins a comment, which is immediately highlighted in the comment style. The default for comments uses the Comic Sans font in italic form as shown above. The default settings shown above are described in the table below. Default Syntax Highlighting
To Change the Syntax Format:
Printing ScriptsTo print a script, use the standard method of File
> Print or the Script Printing Options
Related Topics
Mira Pro x64 Script User's Guide, v.8.76 Copyright Ⓒ 2024
Mirametrics, Inc. All Rights Reserved. | ||||||||||||||||||||||||||||