Aperture Photometry Example
Astronomy Module Specific
The example below illustrates the basic steps of doing aperture photometry on point sources. The commands used to execute the tasks below are located on the Aperture Photometry Toolbar.
The first image below shows 3 objects marked.
Objects 1 and 2 are target objects and object 3 is a standard star
with the label 3*. Objects 1 and 2 were marked using the standard
Marking Mode, enabled by clicking ![]() on the
toolbar. Mira tries to get the photometric zero point from a
ZERO-PT keyword in the image header. If that keyword exists, the
values listed at the time you click on the object will be
instrumental magnitudes that include the zero point value.
Otherwise, if there is no ZERO-PT
keyword, raw magnitudes will be listed. They will be very negative,
like -5 or -12. When the zero point is calculated (see below),
these values get updated using the new zero point and they will
change to values more like 17 or 11.
on the
toolbar. Mira tries to get the photometric zero point from a
ZERO-PT keyword in the image header. If that keyword exists, the
values listed at the time you click on the object will be
instrumental magnitudes that include the zero point value.
Otherwise, if there is no ZERO-PT
keyword, raw magnitudes will be listed. They will be very negative,
like -5 or -12. When the zero point is calculated (see below),
these values get updated using the new zero point and they will
change to values more like 17 or 11.
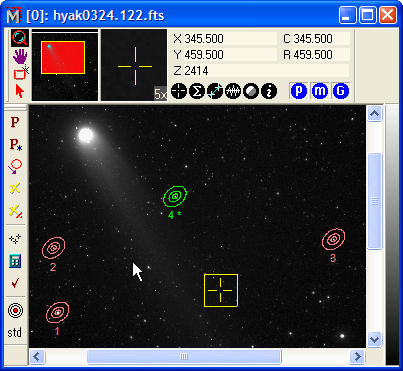
Object 3*, the standard star, was marked on the
image after clicking ![]() to enable Standard
Star marking Mode. Auto-centroiding was enabled from thePoints
Preferences page, so the positions were locked onto precise
object positions. When a standard star is marked, Mira requests the
standard magnitude for use in computing the photometric zero point.
The zero point is not calculated until you click the
to enable Standard
Star marking Mode. Auto-centroiding was enabled from thePoints
Preferences page, so the positions were locked onto precise
object positions. When a standard star is marked, Mira requests the
standard magnitude for use in computing the photometric zero point.
The zero point is not calculated until you click the ![]() (calculate) button.
(calculate) button.
On the Other Preferences page of the Aperture Photometry Preferences dialog, the Verbose Messages option was checked. As a result, Mira listed the zero point calculation results in a Text Editor window like that shown below.
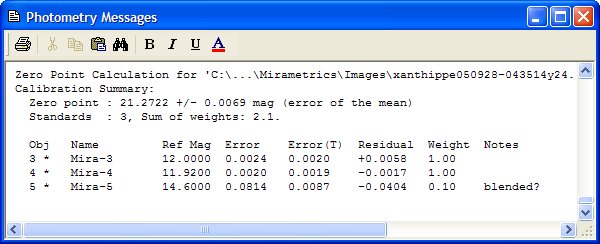
Each new calculation and some other massages add to this window. You can add your own comments, delete text, etc. to keep notes of the procedure. This information is also listed for each image in the table on the Calibration Preferences page of the Aperture Photometry Preferences dialog.
 After Mira calculates
the photometric zero point for each image, it adds that value to
the header of each image for which it is calculated using the
ZERO-PT keyword. If an image is in FITS format, the zero point can
be saved with the image. If it is saved, then Mira will use it for
that image the next time you do photometry on it. Of course, you
can always add new standard stars to refine the zero point for the
image.
After Mira calculates
the photometric zero point for each image, it adds that value to
the header of each image for which it is calculated using the
ZERO-PT keyword. If an image is in FITS format, the zero point can
be saved with the image. If it is saved, then Mira will use it for
that image the next time you do photometry on it. Of course, you
can always add new standard stars to refine the zero point for the
image.
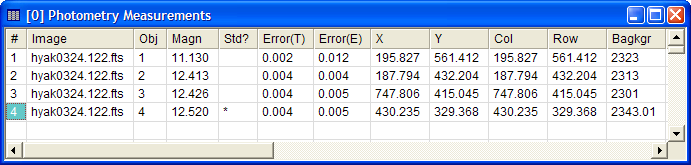
The magnitudes and other measurements are listed in the Photometry Measurements report. Each Image Window with a photometry procedure active has its own report window that holds the measurements for all of its images. You can tell which report goes with which window by noting the identical Serial Numbers (the number x in the "[x]" at the beginning of the window caption).Notice that the apertures in the first figure above picture are elliptical, not round, and they do not appear to match the shape of the star images. The apertures were made intentionally elliptical to illustrate that capability of Mira for the case when the objects really are not round.
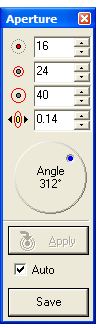
The figure above shows the small Aperture Tool window which
is used to set the aperture sizes, shape, and orientation. This
floating tool window is opened by clicking ![]() on the Aperture Photometry Toolbar. [more]
on the Aperture Photometry Toolbar. [more]
The Photometry Measurements window below shows 12 of the 22 columns in the measurement table. You can manipulate the table in various ways as for any Mira Report Window. For example, you might want to save the results to a text file or copy it to the clipboard for pasting into Microsoft Excel.
Finally, if a zero point value was calculated during this photometry session, the zero point for each image was saved in each of the image headers. However, this is not yet a permanent change to the images since they may not yet have not been saved to a file. You can save the images using one of the Save commands or the related commands for saving an Image Set.
Aperture Photometry, Aperture Photometry Preferences, Photometry Measurements, Aperture Tool