Clean Image Set
The Clean Image Set command identifies and, optionally, repairs artifacts which are caused by a variety of sources including cosmic rays and ionizing radiation events. In this context, the term "event" means any pixel value in one image that is not persistent, within the noise, throughout the image set. This technique therefore detects "events" that occur in only 1, 2, or a few images (depending upon the size of the image set). As a result, a field of view must be aligned through the image set so that events can be separated from persistent features. You also can use this command to clean cosmic rays from long exposure, weakly illuminated flat field calibration frames that are not aligned, since the persistent flat field structure is automatically aligned. When an image set is registered before cleaning, poorly corrected hot or cold pixels shift around and appear as events, and the method detects them the same as true radiation events. For a demonstration, see the Example, below.
The Clean Image Set command opens from the Process > Cosmetics menu.
This method detects outlier pixels by comparing the values at the same pixel location in a series of images. In comparison, most cosmic ray detection algorithms use information from neighboring pixels within the same image. Using neighboring pixels within the same image makes it difficult to separate outliers from sharp features, such as the peaks of stars. The current method is not sensitive to pixel values in the neighborhood of the target pixel because the sample of pixel values used for rejection is tracked through the image set. However, this makes the requirement that the images must be registered in software, using the Register Images package, Align by WCS, or the images must have been aligned when acquired.
This method differs from contrast-based methods that are used for single images, such as the Apply Cosmic Ray Filter calibration method and the "Cosmic Ray Filter" option in the Spatial Filters command. The term "contrast" refers to the value of a pixel relative to its neighbors. The present method detects events using information from variations in the same pixel throughout the image set, whereas a contrast-based method detects events as outliers relative to pixels in the surrounding neighborhood. A contrast method has difficulty separating outlying pixel values from rapid changes in the brightness of persistent features such as stars.
|
Note: |
This method will detect a variable object or transient object as an "event" and reject it from the images. Do not use this method if the image set contains an object or feature you want to analyze which is varying or moving by a significant amount. |
Cleaning also can be done when images are combined using Sigma Clipping, Alpha Clipping, the Median, or some other image combining methods. The present command does not combine the images but instead it identifies and, optionally, repairs the events occurring in the separate images. If you want to combine the cleaned images, use the Combine Images command. In the present command, most Repair Method options fix the event pixels but the "Set Pixel to Zero" option prepares the images for combining by the Masked Mean Value method (the "Mean - Masked by 0" option in the Combine Images command).
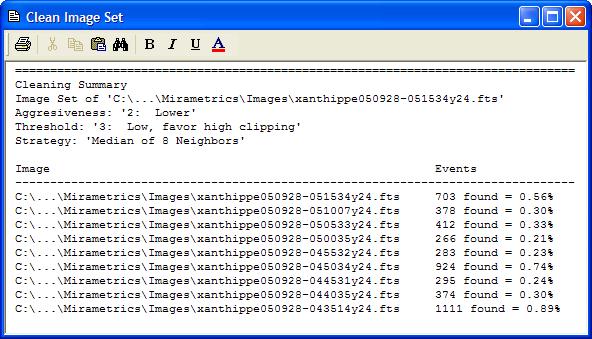
This method will identify outlying pixel values regardless of what causes them. Therefore, you can use it to clean cosmic rays and other radiation events as well as dead pixels and under corrected hot pixels. For many applications, you do not want to repair too many pixels. The Verbose Summary option lists not only the number of events detected but also the number of events as a percentage of the total pixel count. In the example below, cleaning was done using settings shown above, which resulted in a percentage of 0.2 to almost 1%. These values would be quite high for 2 minute exposures if all the events were caused by ionizing radiation of some type. In these images, the algorithm is also detecting a number of pixels having poorly corrected dark current.
|
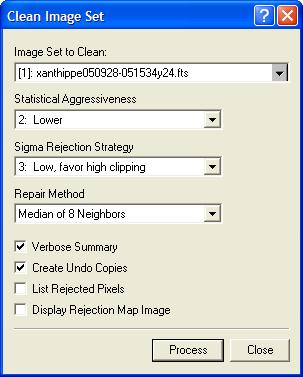
Parameters of the Clean Image Set command |
|
|
Image Set to be Cleaned |
Select the Image window containing the image set to process. This command only works with image sets and the list is updated as each new image window is created, so be sure the target image window you want to process is selected. |
|
Statistical Aggressiveness |
Controls the statistical cutoff for the probability that an outlier pixel is actually a bad pixel. A lower setting rejects pixel values that are more deviant from the others and a higher setting rejects pixels that are less deviant from the others. |
|
Sigma Rejection Strategy |
Controls whether more or fewer outlying values are rejected and whether they are rejected symmetrically about the mean. |
|
Repair Method |
Select the method to apply to the detected outlier pixels. The Replace with Zero method replaces the outlying pixels with a value of 0 for combining using the "Mean - Masked by 0" method. |
|
Verbose Summary |
Check this box to give a verbose listing of results in an Editor window. |
|
Create Undo Copies |
Check this box to create Undo copies of the image set, You can then use the Undo (Ctrl+Z) command to recover the original images, perhaps to try a new selection of parameters. Not using this method helps conserve memory if you are combining a large set of large images which use most of the available memory. |
|
List Rejected Pixels |
Check this box to list the coordinates of the rejected pixels. The listing is in a format which could be saved to a Pixel Mask file for additional processing. |
|
Display Rejection Map Image |
Check this box to display an image showing the rejected pixels. The image has a zero background and is encoded with a value that corresponds to the sequence number of the image where that pixel was rejected. For example, a pixel value of 3 means that the pixel was rejected from the 3rd image of the image set. |
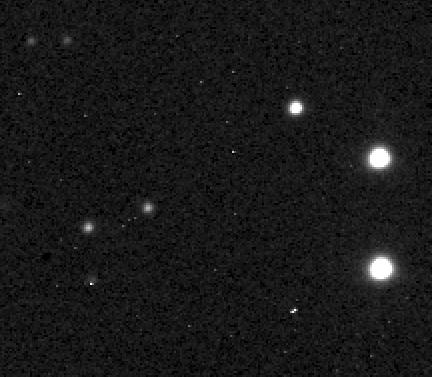
Below is a comparison between images before (top) and after (bottom) cleaning. This comparison shows a single image from the image set, not a combination of the cleaned images.
In the upper image, notice the radiation event about 1/4 the way inward from the lower left corner, which falls upon a star. In the lower image, notice how it was effectively repaired while preserving the star. This would be difficult to achieve "blindly" using just a single image since, in that case, neighborhood pixels are used to determine what is an outlying pixel relative to a "normal" pixel.

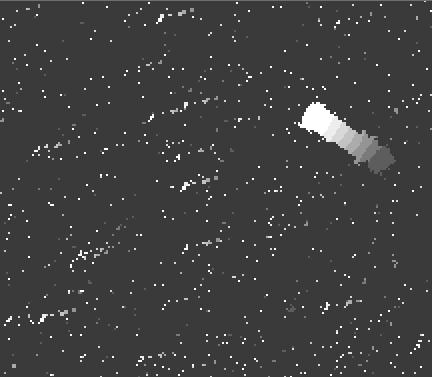
Below is the pixel rejection map image that is produced when Display Rejection Map Image is checked. The Map Image contains a pixel value that is the index of the image in which the event was detected. For example, a value of 1 indicates a pixel rejected in image 1 of the image set. Near the upper right of the image, notice the moving blob which corresponds to the minor plant Xanthippe that was moving during the acquisition of the image set. The trail has values ranging from 1, at the lower right, to 9 at the upper left, which corresponds to images 1 through 9 of the image set. This illustrates the limitation of the method: it will detect the pixels of a "significantly" variable object or transient object as an "event" and reject it. How significant is "too significant" depends upon the image properties and your particular application.
Repairing Artifacts and Cosmetic Defects, Create Pixel Mask, Apply Pixel Mask, Apply Blemish Mask, Pixel Mask Editor, Blemish Mask Editor, Interactive Repair