Edit Blemish Mask
The Edit Blemish Mask command is used to enter the region description for image blemishes. These coordinates are used by other commands to correct pixel artifacts on an image using the Apply Blemish Mask method in the Image Calibration Pipeline. Blemish information is entered into the editor, then saved together into a single file using the Profile protocol.
Open the Blemish Mask Editor from the Process > Cosmetics menu.
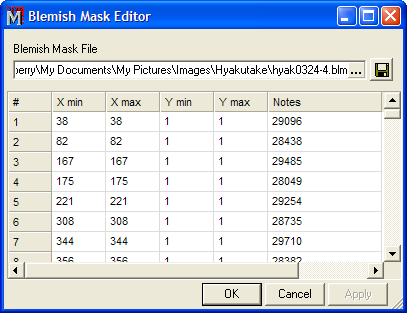
The Blemish Mask Editor is a resizable Table Editor window. The Mask file current loaded is listed in the drop edit field at the top of the window.
Type X (column) and Y (row) limits for each defect on a separate line of the table. The Notes entry is optional.
The editor adds lines in chunks of 100. If you run to the end of the buffer, right click on the table to open its context menu and select Append Rows. Then continue entering blemish data.
When you are finished typing and changing values, save using one of these methods:
Click [Apply] to save to the original file.
Click the ![]() button to save
it in a new or different file.
button to save
it in a new or different file.
Click ![]() on the right end of
the Blemish Mask File field. Select
the blemish file and click [Open] to
load the blemish mask.
on the right end of
the Blemish Mask File field. Select
the blemish file and click [Open] to
load the blemish mask.
When you are finished typing and changing values, save using one of these methods:
Click [Apply] to save to the original file.
Click the ![]() button to save
in a new or different file.
button to save
in a new or different file.
A blemish is usually a horizontal or vertical line or a rectangular region containing an artifact. Typical examples of a column blemish are known as a hot column or a cold trap. Points are also considered a blemish, but points may also be repaired using the Apply Pixel Mask method. There are two ways to create a pixel mask; see the Edit Pixel Mask and Create Pixel Mask commands.
A Blemish Mask is usually stored in a file with a
blm extension, like Blemish-list.blm, although
txt or any other extension is possible. Each line of the
blemish mask file contains the column range X
min to X max and the row
rangeY min to Y
max for a single blemish. The Notes column holds an optional comment for the
blemish. For example, the first line in the dialog above defines a
line defect at column 155, extending from row 44 through row 125.
This is commonly called a "partial bad column".
|
Note |
Remember that coordinates in Mira are 1-based, meaning that pixel (1,1) is the origin of the image array. See Image Coordinate System and Pixel Coordinate Definition. |
Edit Pixel Mask, Apply Cosmic Ray Filter, Apply Blemish Mask, Image Calibration, Apply Pixel Mask, Image Coordinate System, Repairing Artifacts and Cosmetic Defects