Working with Toolbars
The Mira user interface contains two types of toolbars: Top-level Toolbars and Window toolbars. These two types of toolbar operate commands at different levels of the user interface:
Top-level Toolbars attach to the main Mira window and work with data in windows of a particular type or execute functions that do not use data viewed in any window. Some commands from top-level window open Window Toolbars.
Window Toolbars work only with data in their parent window and attach only to the border of their parent window.
If a Top-level Toolbar button opens a Window Toolbar for a specific window, the button will highlight whenever that window is top-most.
To close a Window Toolbar opened from a button on a Top-level Toolbar, click the highlighted button.
Top-level Toolbars work with view windows such as an Image Window. The toolbar applies its functionality only to the top-most window. If a toolbar button is not associated with the type of data in the top-most view window, then the button is disabled. For example, if a Plot Window is made top-most, then most of the buttons the Top-level Toolbars will disable because their command does not work with a Plot Window. Those buttons will enable when an Image Window is made top-most.
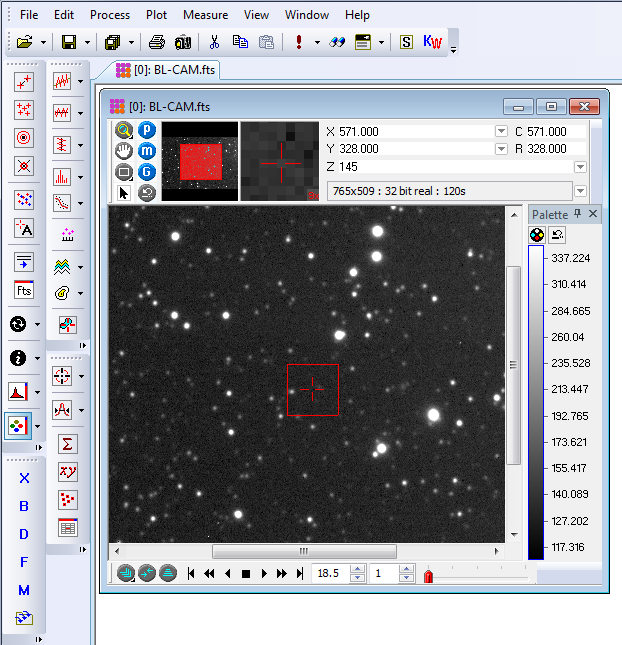
All of the main toolbars, as well as the main menu,
can be moved to different borders of the Mira application window.
They can also be floated free of all borders. The picture below
shows all of Mira's top-level toolbars displayed in vertical format
along the left application border. In this example, all toolbar
buttons are enabled (not grayed), meaning that they either operate
a function for the image window shown, or they operate a global
command that does not use an image window. If, for example, a
Plot Window were the
top-most view window, then most of these buttons would be disabled
as they apply to commands for Image Windows. Also, some of these
button commands only work for an Image Set. If an image set were not displayed in the
top-most window, the ![]() button
would be disabled.
button
would be disabled.
Top-level Toolbars
|
The Mira Tools toolbar is the main toolbar,
with commands that work outside of view windows (e.g., Image Windows). These
commands work even when no view window is displayed. For example,
the Open command
|
|
|
The Image Tools toolbar has commands that
operate on images in Image Windows, such as Rotate |
|
|
The Image Measurements toolbar has commands that open local window toolbars for making measurements, such as point and distance/angle collections. |
|
|
The Image Plots toolbar has commands that generate plots (graphs) from data displayed in an image window. |
|
|
The Cursor Tools toolbar has commands that work with theImage Cursor. These include commands for measuring, etc. |
|
|
The Calibration Tools toolbar has commands that perform various types of image intensity calibration. These commands create master calibration frames, apply calibration frames, and repair image defects and artefacts. |
Buttons in a top-level toolbar operate several kinds of commands which have a user interface as described in the table below. These interfaces include simple button commands, docking panes, Window-level toolbars, drop-menus, and regular button commands. In general, it is not clear beforehand which kind of interface is associated with the button, but Mira provides guidance in a status message which appears when you hover the mouse over the toolbar button. Hovering over the button causes a short description of the button's command to appear in the status bar at the bottom of Mira's main window. Buttons that open docking panes have their own hint, as described in the following table:
|
Command Interfaces opened from a Top-level Toolbar Button |
|
|
Window Toolbars |
Many complex or multi-step commands are
organized into packages using their own toolbar which opens inside
a particular window. An example of a window toolbar is Labeling an image, in
which case the Image Labeling toolbar opens by clicking the
Clicking a top-level toolbar button opens the window toolbar in the top-most view window. If the command toolbar is already open in the target window, the button closes it. |
|
Docking Panes |
All buttons that open a docking pane indicate that they are associated with a docking pane by showing a red border above or to the right of the toolbar button icon. An example is the To open the docking pane, click the button. The pane will dock along ht border of the top-most Image Window. If the pane is already open in the target window, clicking the toolbar button closes it. |
|
Drop Menus |
Commands that have a drop menu show a command button icon plus a black down-arrow. Click the button to execute the standard function of its type. The drop-menu contains other related functions; to open the drop menu, mouse down on the arrow. Release the mouse on the selected menu command. |
|
Toolbar Configuration |
The Toolbar Configuration button appears at the end of every top-level toolbar. Click this arrow to add or remove buttons from the toolbar or configure other aspects of the user interface. |
|
Button |
A button that does not use the features described above is connected to a single command. Simply click the button to execute the command. |
The configuration of the Toolbar interface can be adjusted in many ways:
Top-level toolbars can be moved around to dock on both horizontal and vertical borders of Mira's main window.
Top-level toolbars may be selectively displayed or hidden. To show or hide a toolbar, right click on the toolbar or toolbar area of the Mira window frame, then select the named toolbar from the list.
Buttons shown in Top-level toolbars can be
displayed or removed. To do this, click the configuration button
![]() at the end of the target toolbar,
select "Add or Remove Buttons", then change the button
selection.
at the end of the target toolbar,
select "Add or Remove Buttons", then change the button
selection.
Window Toolbars operate complex procedures,
or "packages", that apply to a specific window. For example, the
Aperture
Photometry Toolbar is an example of a window toolbar which
operates the aperture photometry package for a specific Image Window. Therefore,
they dock to the border of the specific window rather than to the
main application window. Various feature modules, such as Souce
Extraction, operate by window toolbars localized to the specific
window for which there are opened; for example, 5 image windows may
be open but 3 of them each have an aperture photometry toolbar,
indicating those 3 have an open Aperture
Photometry Toolbar. The screenshot below shows the same view as
above, but after the ![]() button on the Image Measurements Toolbar was clicked to open the
Aperture
Photometry Toolbar for the top-most (in this case, only) Image
Window. Notice that the aperture photometry button is highlighted
on its top-level toolbar, indicating that its package is opened in
the top-most Image Window. If a different Image Window that did not
have aperture photometry active were to become top-most, the button
would remove its highlighting.
button on the Image Measurements Toolbar was clicked to open the
Aperture
Photometry Toolbar for the top-most (in this case, only) Image
Window. Notice that the aperture photometry button is highlighted
on its top-level toolbar, indicating that its package is opened in
the top-most Image Window. If a different Image Window that did not
have aperture photometry active were to become top-most, the button
would remove its highlighting.
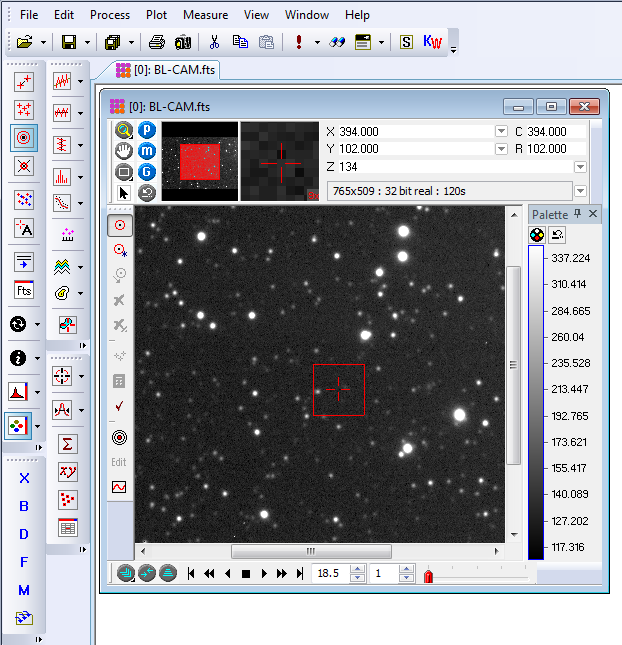
Image Bar, Animation Bar, Plot Bar, 3-D Animation Bar, Rotation Toolbar, Command Dialogs