![]() Astrometric
Calibration
Astrometric
Calibration
The Astrometric Calibration command creates a high-precision coordinate calibration for an image. This calibration allows you to do astrometry on the image—that is, to measure accurate positions of objects directly in units of celestial coordinates. If you save the calibrated image in FITS format, the calibration is saved with it using the FITS World Coordinate System ("WCS") standard protocol. This means that the coordinate calibration will be intact if you re-open the image or send it to another person using software that understands the FITS WCS standard. The calibration process is sometimes called a "plate solution", referring to the old days when photographic plates were measured. Actually, the plate solution is only part of the story. There is also the saving of the calibration in a format that can be understood by other software. Hence we refer to the entire process as "astrometric calibration".
Astrometric Calibration opens from the Image Window > Coordinates menu when the target image is in the top-most image window.
Set Properties using the Calibration Properties dialog and the Marker Properties dialog from the toolbar (see below).
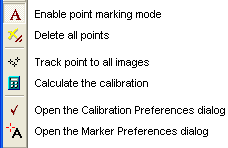
The Astrometric Calibration procedure is driven by button commands on the toolbar shown below. In addition, there are Properties that control the procedure (see Calibration Properties) and the placement and drawing of markers (see Marker Properties). The toolbar commands are described below.

The Astrometric Calibration process creates a mathematical relationship between the image coordinates in terms of pixel units (column,row) and celestial coordinates (Right ascension, Declination). To get compute this calibration requires knowing both sets for coordinates for each one of 3 or more points in the image. From this information, Mira computes the calibration equations, or "plate solution". Although reference stars are usually used, a reference point can be any type of object for which celestial coordinates are known, for example, a QSO or BL Lac object will work just as well. All Mira cares about is that, for each reference point, the celestial coordinate is known for the pixel coordinate marked in the image.
Achieving a calibration involves marking a number
of points on the image and entering the celestial coordinates for
each one. As each point is marked, Mira opens lists its position
and the coordinate data you entered into a Report window named
"Astrometric Calibration". After you have marked at least 3 points,
you can do the calibration simply by clicking the ![]() button. When you do the solution, Mira lists the
results in a text editor window named "Astrometric Calibration
Results" and adds "residual values" to the Report window. From this
information you can assess the quality of the plate solution and
hence the ability of the astrometric calibration to give accurate
coordinate values in the image.
button. When you do the solution, Mira lists the
results in a text editor window named "Astrometric Calibration
Results" and adds "residual values" to the Report window. From this
information you can assess the quality of the plate solution and
hence the ability of the astrometric calibration to give accurate
coordinate values in the image.
To calculate the plate solution, a minimum of 3 reference points is required. However, using more than 3 stars can reduce the statistical uncertainty of the calibration to be reduced and, most importantly, allows you to discover calibration errors involving mid-identifications and wrongly entered coordinates. As part of the plate solution, Mira lists the plate solution results and adds residual values to the table of data for the marked points. The residuals list the actual minus predicted positions of the calibration points. The predicted position is calculated from the calibration and the predicted position is what you entered for each point. Points having high residuals are likely to be misidentified or have erroneous coordinates; in either case, the bad point pulls the plate solution away from its correct value toward the bad point. However, the residual of the bad point remains high because a single point does not have enough weight to overcome the tendency for all the others to adhere to a common plate solution. If you see a point with a residual far higher than the others, you need to remove the point or change its data and then recompute the solution. Details on how to mark, delete, and change the point data are given in the following sections.
It is important to remember that creating an astrometric calibration does not necessarily save the calibration permanently to the image file. To save the calibration, you must save the file using one of the File > Save methods. However, the unsaved calibration continues to work in the image so long as its window is open, or until you manually delete it using the Delete WCS command. If you do not save the image(s), the calibration is automatically discarded when you close the image window.
To mark a point, you must click to mark it and then enter its reference data (celestial coordinates). Do the following:
Activate marking mode (press the top toolbar button).
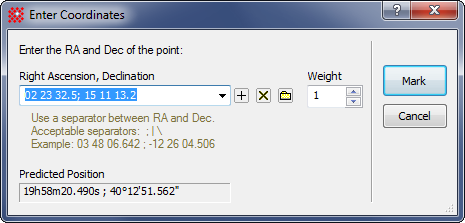
Click on the target point to open the Enter Coordinates dialog. The Enter Coordinates dialog opens as shown below.
Type the right ascension and declination of the point into the dialog. If the coordinates have recently been entered, they they may be in the history list (click the drop button and select the coordinates from the list).
Click [Mark] to accept the point with the data you have entered, or click [Delete] to discard the point.

Note that the point where you mark can be taken as the exact location of the click or as the centroided position near where you clicked. Usually, the centroid position is preferred. You can enable or disable automatic centroiding using the Centroid page of the Marker Properties dialog.
After you have marked reference points, you may wish to change the data for one or more of them, or even delete them from the calibration altogether. This is useful for improving the plate solution when it predicts that one or more of the points you used has high residuals and may be of poor quality. To change or delete one or more points, you must use the Change Point Data dialog. You can open the Change Point Data dialog using one of the following methods:
Activate marking mode (press the top toolbar button).
Click on the marker of the point you want to change,
Or
Right click on the row of the target point in the Report window to open the context menu.
Choose the Change Point or Delete Point command from the menu. If you select Change Point, this opens the Change Point Data dialog. If you select Delete Point, you bypass the dialog.
From the Change Point Data dialog, you can do the following:
To change the reference point data, modify the values and click [Accept].
To delete the point, click [Delete].
If you just want to examine the point data but not alter it, click [Cancel] to close the dialog without making changes.
When an image set is registered (aligned) or close to being correctly registered, Mira provides a shortcut for calibrating the image set together. To do this, you calibrate one image of the image set and then extend that reference points to the other images. Here is how to do this:
Open the image set together in the same window.
Select one of the images as a master image. Mark reference points on it and create a plate solution as described above.
Click ![]() on the toolbar to extend
the reference points to the remaining members of the image set.
on the toolbar to extend
the reference points to the remaining members of the image set.
If the Auto Update box is checked in the Other
Properties dialog and the ![]() button is
active (blue) then Step 3 automatically calibrates the entire image
set as part of the tracking process. Otherwise, click
button is
active (blue) then Step 3 automatically calibrates the entire image
set as part of the tracking process. Otherwise, click ![]() to calibrate all the images of the image set.
to calibrate all the images of the image set.
(Optional) Scroll through the image set to be sure that the reference markers transferred correctly. If needed, add, change, or delete markers and reference data in the other images.
If desired, save the calibrated images using one of the Save Image Set commands in the File menu.
If you don't want to keep the astrometric calibration, you can discard it using the Delete WCS command.
Note: You cannot use the Undo method to delete the astrometric calibration since a full backup copy of the image is not saved by this command.
Tutorial: Introduction to Astrometric Calibration, World Coordinate System, Set Equatorial Scale, Enter Coordinates, Change Point Data, Calibration Properties, Marker Properties.