To open the Centroid Properties page,
click the ![]() button on a Command Toolbar and
select the Centroid tab.
button on a Command Toolbar and
select the Centroid tab.
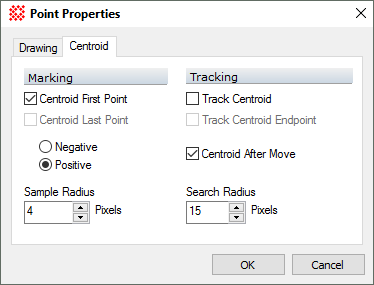
Centroid Properties (Markers)
The Centroid Properties page page of the Marker Properties dialog controls how positions are marked on the image. This page is part of the Marker Properties dialog which is used by various drawing commands. This is a generic dialog. The title and set of enabled controls that appear on the page depend upon the package that opened it.
To open the Centroid Properties page,
click the ![]() button on a Command Toolbar and
select the Centroid tab.
button on a Command Toolbar and
select the Centroid tab.

|
Marker Centroid Properties |
|
|
|
Check this box to centroid the starting point, or only point, used for locating the marker. |
|
|
Check this box to centroid the ending point used for locating the marker. This applies to lines |
|
|
Selects whether to centroid on positive-going values (peaks) or negative-going values (valleys). |
|
Sample Radius |
Specify the radius, in pixels, used for computing the centroid (first point and last point). |
|
|
Check this box to track the centroid position of the first (or only) point when tracking the marker through an image set. |
|
|
Check this box to track the centroid position of the last point when tracking the marker through an image set. |
|
|
Check this box to centroid the marker after re-positioning it in Move mode. |
|
Search Radius |
Enter the radius, in pixels, used for tracking the marker through an image set. |
Using the Centroid properties, the marker can be centroided at its beginning or ending point, or at both points or not at all. The meaning if the centroid Properties is as for other cases where centroiding is used. For example, see the Centroid Properties for measuring images.
The Sample Radius defines the distance from the target point within which points are used to compute the centroid position. A reasonable radius value is approximately half the diameter of a point source, such as a star image.
The Tracking Radius is used when computing the centroid of an Image Set. This value defines the maximum offset distance Mira will search in the next image to lock onto a new centroid position.
The Track Centroids option controls the duplication of markers when the positions are "tracked" through an image set. If Track Centroids is checked, the positions are centroided in every image.
Centroid positions are computed using image data, not the screen display. Choose Positive points or Negative points based upon the type of object to measure rather than the palette or other image display properties. For modern, inherently digital images, you will almost always choose Positive points. For scanned photographs, however, you may be working with a negative image and would choose the NegativePoints option.
Marker Properties Dialog, Drawing Properties, Command Toolbars