Clean Image Set
The Clean Image Set command identifies and, optionally, repairs random image artifacts caused by a cosmic rays and ionizing radiation events that appear at a given location in one image but not another. This command works on a displayed Image Set. Example: See the Tutorial: Cleaning Artifacts from an Image Set.
The Clean Image Set command opens from the Image Window > Process > Calibration menu when an Image Set is displayed in the top-most window.

This command processes the Image Set "in place" to replace the images already displayed. The processed images can be reverted to their prior state using the Undo command. For many applications, you do not want to repair too many pixels. The Verbose Summary option lists not only the number of events detected but also the number of events as a percentage of the total pixel count. If the Verbose Summary option is checked, Mira lists a processing summary in the Message Pane at the bottom of the Mira application window.
The Clean Image Set algorithm detects random "events" that appear at the same location in only 1, 2, or a few images of a large collection of images of the same field of view. The algorithm uses the pixel information from a series of images to identify the artifacts in each of the individual images. Therefore, this command works only on an Image Set made from multiple images of the same field of view. To separate artifacts from persistent features, the images must be aligned through the image set. If an image set is registered in software before cleaning, poorly corrected hot or cold pixels shift around, causing the algorithm to detect them the same as true radiation events.
This algorithm detects outlier pixel values by comparing them with a statistical model based on information from the entire image set. This has advantages over other methods commonly used to reduce outlier noise from radiation events: Most cosmic ray detection algorithms use information from neighboring pixels within a single image. The weakness of such methods is their difficulty in distinguishing outliers from sharp persistent features such as the peaks of stars. Conversely, standard image combining techniques using rejection methods such as Sigma Clipping, Alpha Clipping, or the Median, can remove outlying pixels as part of merging but end up producing a single image (see Statistical Estimators for Image Combining). One weakness of rejection methods is that the Signal to Noise Ratio ("SNR") is lowered in comparison with simple Mean combining, either as a result of rejecting ("clipping") pixels or by the nature of the Median process itself. the median reduces the SNR of all pixels by about 20%. In comparison, the present algorithm attempts to modify only the true outlier pixels and does so in the individual images without actually combining them. To do this, the present method requires that the image features (not the defects) must be aligned, or "registered", to within about 1 pixel so that a statistical model can by built for the image set. If the images require alignment in software, this can be done using one of several Mira tools, including the Image Registration package, the Align by WCS, and the Align on Point commands. When registering images for the purposes of this command, consider choosing the "nearest neighbor"resampling option to preserve the noise structure of the individual images.
|
Note: |
This method will detect a variable object or transient object as an "event" and reject it from the images. Do not use this method if the image set contains an important object or feature that is significantly varying in position or brightness between the images. |
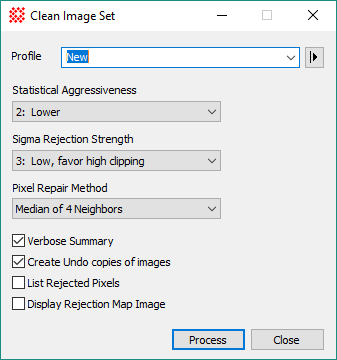
Clean Image Set Properties
|
Profile |
Selects the parameter profile for this command and allows you to save or work with existing presets. |
|
Image Set to be Cleaned |
Select the Image window containing the image set to process. This command only works with image sets and the list is updated as each new image window is created, so be sure the target image window you want to process is selected. |
|
Statistical Aggressiveness |
Controls the statistical cutoff for the probability that an outlier pixel is actually a bad pixel. A lower setting rejects pixel values that are more deviant from the others and a higher setting rejects pixels that are less deviant from the others. |
|
Sigma Rejection Strategy |
Controls whether more or fewer outlying values are rejected and whether they are rejected symmetrically about the mean. |
|
Repair Method |
Select the method to apply to the detected outlier pixels. The Replace with Zero method replaces the outlying pixels with a value of 0 for combining using the "Mean - Masked by 0" method. |
|
|
Check this box to give a verbose listing of results in an Editor window. |
|
|
Check this box to create Undo copies of the image set, You can then use the Undo (Ctrl+Z) command to recover the original images, perhaps to try a new selection of Properties. Not using this method helps conserve memory if you are combining a large set of large images which use most of the available memory. |
|
|
Check this box to list the coordinates of the rejected pixels. The listing is in a format that could be saved to a Pixel Mask file for additional processing. |
|
|
Check this box to display an image showing the rejected pixels. The image has a zero background and is encoded with a value that corresponds to the sequence number of the image where that pixel was rejected. For example, a pixel value of 3 means that the pixel was rejected from the 3rd image of the image set. |
Tutorial: Cleaning Artifacts from an Image Set
Repairing Artifacts and Cosmetic Defects
Mira Pro x64 8.67 User's Guide, Copyright Ⓒ 2023 Mirametrics, Inc.
All Rights Reserved.