Create Master Bias
The Create Master Bias command combines raw
bias frames to create a Master Bias frame having higher signal to
noise ratio than any of the raw frames. This command also allows a
bias correction to be applied to the raw bias frames before
creating the new master bias. The utility of this feature is for
creating a master bias that reflects only part of the bias
correction, for example, to evaluate changes to the bias pattern or
structure in comparison with a baseline bias frame.
-
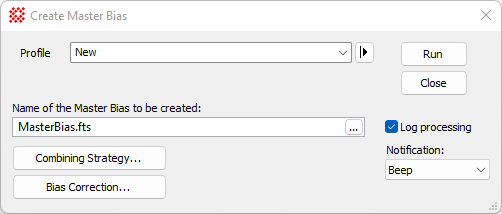
The Create Master Bias command opens from
the Image Window > Process >
Calibration menu and  button
on the Main Toolbar. The "immediate"
form, shown first, opens when an image or image set is displayed in
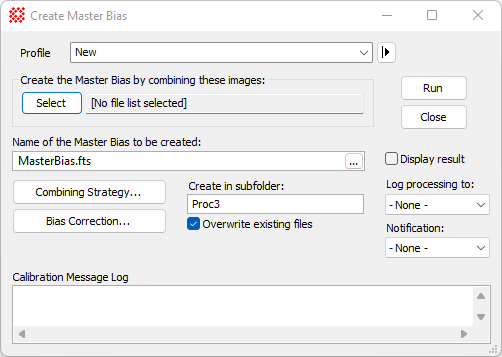
the top-most window. The general form can be used to select source
images from folders, windows, or by matching templates.
button
on the Main Toolbar. The "immediate"
form, shown first, opens when an image or image set is displayed in
the top-most window. The general form can be used to select source
images from folders, windows, or by matching templates.
Create Master Bias Properties
|
Profile [|>]
|
Manages the parameter collection used by this
dialog. See Profile
Control for details.
|
|
Select
|
Opens the Select Source Images dialog for selecting
source images to be processed into the final calibrated result. The
name of the first selected file or displayed image is listed in the
field to the right.
|
|
Name of Master Bias to be created
|
Enter a name for the Master Bias being created or
click [...] to browse and choose a
name from existing images.
|
|
Create in subfolder:
|
Enter the name of the subfolder where the Master
Bias will be created. This is a subfolder of the folder containing
the first raw
bias frame in the source image list.
|
|
 Overwrite existing
files Overwrite existing
files
|
Check this box to overwrite an existing file
having the same file name in the output subfolder. If this box is
not checked and a file of the same name exists, an underscore and
number will be appended to the output file. For example, if
MasterBias.fts exists and this box is
not checked, then the output file will be named MasterBias_2.fts
|
|
Combining Strategy...
|
Click this button to set properties for combining
the flat frames. This opens the Image Combining
Strategy dialog.
|
|
Bias Correction...
|
Click this button to open the Bias Correction
Properties dialog for applying an existing bias correction to
the raw bias frames. For example, you may wish to compute a
"pattern bias" frame from raw bias frames by subtracting an
existing master bias.
|
|
Display result
|
Check this box to display the resulting Master
Bias.
|
|
Log Processing
|
Check this box to list verbose processing messages
in a Text Editor
window. If the window already exists from previous processing by
this or another calibration command, then its contents are
appended.
|
|
Log processing to:
|
The drop list provides options for listing
messages:
-- None -- lists no
processing messages
Messages lists
processing messages in the "Calibration Message Log" text area at
the bottom of the dialog.
Text Editor lists
processing messages in a Text Editor window named "Calibration Message
Log".
|
|
Notification:
|
Select the type of notification Mira issue when
processing is finished:
Do nothing quietly
ends the processing without notification.
Beep creates a
notification sound,
Message displays a
notification message in a top level dialog that locks out Mira use
until you dismiss the message.
|
Canceling the Processing
If you wish to cancel the task before it completes,
either click the [Cancel] button on
the Progress window or press the Esc
key.
|
Tip
|
To abort the calibration before it is finished,
click the [Cancel] button on the
progress window or press the Esc key.
Mira will prompt you for confirmation to quit. If you confirm, the
task will terminate immediately.
|
If the This window
option is selected for the List results
in option, Mira logs processing messages in the
Results box at the bottom of the
dialog. Messages appear after the processing finishes. The
Results field has a right-click menu
as shown below. Using this menu you can save messages to a text
file and copy from the box to the Windows clipboard or a Mira
Text Editor. Only
selected (highlighted) text is copied. Commands for editing and
copying the text are available in a pop-up menu opened by
right-clicking inside the results box. The menu is shown below. You
can also elect to save the messages to a Text Editor which offers similar functionality
as well as printing capability.
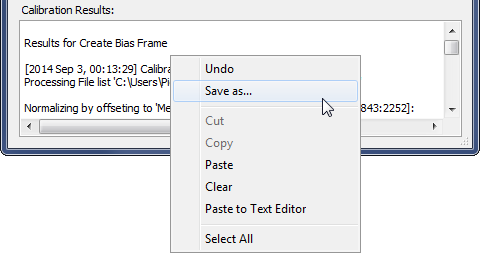
To prevent accidental deletion of calibration
messages, you cannot clear text simply by highlighting and deleting
the text using the mouse. To clear messages, you must use the
Clear command in the pop-up menu.
Related Topics
Calibrating Images
Create Master Dark
Create Master Flat
Create Illumination Flat
Create Pixel Flat
Image Combining Strategy
Select Source Images
Express Image Calibration
Combine Files
Combine Image Set
Bias Correction Properties
Mira Pro x64 User's Guide, Copyright Ⓒ 2023 Mirametrics, Inc. All
Rights Reserved.