Editing the FITS Header
The header of a FITS Format Image contains a lot of image documentation. Most Mira commands update and change it as necessary to keep track of what is done to the image. However, there will be times when you need to change something in the header by yourself. This topic describes how to edit the FITS Header.
If at any time you do not want to save your changes, you can discard all changes by using the [Esc] key to exit the dialog.
|
NOTE |
Lines in the header table that are tinted light red cannot be changed. For some of these keywords, there are other ways to change them. For example, NAXIS1 defines the number of image columns. This value can be changed by the Crop Image command but changing NAXIS1 here could render the image unreadable. |
Mira preserves 1 level of Undo each time you change
a cell in the table. To recover the previous cell content, click
the ![]() button on the lower left corner of
the window or use the Undo command in the Context Menu (see
below).
button on the lower left corner of
the window or use the Undo command in the Context Menu (see
below).
To change the contents of a particular keyword line, the simplest procedure is to directly edit the value or comment cell in the table. Editing a cell is straightforward. Read through the following procedure once before following it step by step so that you understand the available options.
Bring the cell of interest into view using the arrow keys, scrollbars, or by resizing the window.
Double click the mouse on the cell to enter edit mode. This highlights the entire line and leaves the insertion cursor at the end. Do not type anything yet!
If the entire line is highlighted, typing any character deletes the entire content of the cell. This is equivalent to hitting the [Delete] key.
To position the insertion cursor to a specific position, click the mouse pointer on the location. continue typing from there.
When you are finished typing, exit the cell using the keyboard Up and Down arrow keys or click the mouse in a different cell.
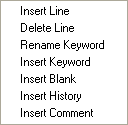
To do more than simple editing, Mira provides extra commands in the FITS Header Context Menu shown below. This menu opens by right clicking anywhere inside the window.

Most of these commands are self explanatory. Their use is described in the table below.
FITS Header Context Menu Commands
|
Undo (optional) |
The Undo command appears only after a change is made. Click it to undo your changes to the cell. |
|
Insert Line |
Inserts a new, blank line at the point of the cursor and activates the editor in the Keyword cell. |
|
Delete Line |
Deletes the line at the cursor. |
|
Rename Keyword |
Opens a list of keywords that Mira knows. Procedure: Position the cursor on the target keyword and right click to open the Context Menu. Choose Rename Keyword to open the list box of known keywords. Select a new keyword. Mira replaces the cell with the new keyword name. |
|
Insert Keyword |
Inserts a keyword from those that Mira knows. Procedure: Position the cursor where you want to insert a new keyword line and right click to open the Context Menu. Choose Insert Keyword to open the list box of known keywords. Select a new keyword. Mira inserts the keyword name into the Keyword cell and moves the cursor to its Value cell. To edit the value cell |
|
Insert Blank |
Inserts a blank line with no keyword, value, or comment. Use this as a spacer to make the header more readable. |
|
Insert History |
Inserts a HISTORY keyword line at the point of the cursor. Your text may span both the VALUE and COMMENT fields of the header. |
|
Insert Comment |
Inserts a COMMENT keyword line at the point of the cursor. Your text may span both the VALUE and COMMENT fields of the header. |
Changes to the FITS header(s) do not take effect until you have accepted them by clicking a button. These changes apply only to the displayed image.
To accept your changes, click [Apply] or [OK].
To discard all changes, click [Cancel] before clicking [Apply]. When you click Apply, all changes made prior to that point are saved.
|
NOTE |
Header changes affect only the displayed image. To make the changes permanent in the FITS file, you must save the image using the File > Save command or an equivalent. |
FITS Header Dialog, History Keywords, Comment Keywords, WCS Keywords