Labels command
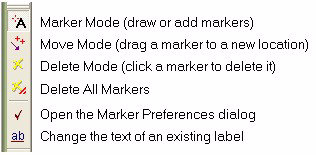
The labels command draws text and markers on a displayed image. The screen image can be copied with the labels for use in graphics arts software or other applications. The labeling process uses the Label Toolbar, which is a standard Window Toolbar. The toolbar opens with Marking Mode active.
Activate the Label
command: Use the Measure > Label menu command or click
the ![]() button.
button.
Be sure the drawing preferences are set as
desired. If not, click ![]() to set them.
to set them.
Be sure you are in Marking Mode (the mouse
pointer will recapitulate the ![]() button).
If not, click
button).
If not, click ![]() to activate Marking
Mode.
to activate Marking
Mode.
To Add labels,
![]() Move the
mouse pointer to the place where you want to create a label and
click the mouse. The Change Label Text Dialog opens to request text for
the label.
Move the
mouse pointer to the place where you want to create a label and
click the mouse. The Change Label Text Dialog opens to request text for
the label.
![]() Enter the
label's text into the edit field. Click [OK] to close the dialog and add the label to the
image.
Enter the
label's text into the edit field. Click [OK] to close the dialog and add the label to the
image.
To Change the
text of an existing label, click the ![]() button on the Label Toolbar.
button on the Label Toolbar.
6. To Delete any label, either
![]() Enter
Delete mode by clicking
Enter
Delete mode by clicking ![]() . Then click the mouse on each label you want to
delete, or
. Then click the mouse on each label you want to
delete, or
![]() Hold down
[Shift] while in Add mode and click the mouse on each label you
want to delete.
Hold down
[Shift] while in Add mode and click the mouse on each label you
want to delete.
Image annotations are a transient overlay of the displayed image. In other words, they do not stay with the image data when you save the file. After you have marked labels on an image, you can copy the screen bitmap to the Windows clipboard using the Edit > Copy command in the Image window's pull-down menu, then paste into other software using Edit > Paste.
To set label preferences, click ![]() on the toolbar to open the Label Preferences
dialog.
on the toolbar to open the Label Preferences
dialog.
Labeling Images shows the detailed procedure of marking labels on an image.
Label Preferences dialog, Label Text dialog, Labeling Images, Image Windows