
Selecting Source Images
Source images are the images used by a command. Mira provides numerous ways to collect source images beyond the typical "display and process" architecture of most image processing applications. Most commands include a Source Image Selection control for this purpose. The [Select] button shown on the command dialog opens the Select Source Images dialog for collecting the images which will be fed back to the command. The Select Source Images dialog has 5 pages which each provide a distinct method for collecting the images to be processed.
The Select Source Images dialog is opened by clicking the [Select} button in the Source Image Selection Control which appears on most Mira command dialogs:
Clicking [Select} opens the Select Source Images dialog describe below. After returning from selecting source images, an abbreviated message shows the selection in the text field to the right of the button. Initially, if no images are selected, the text field lists none selected, as shown above.
The Image Window page selects images displayed in an Image Window. The list box contains the name of the current image for each Image Window on the Mira desktop. The window list is created when this dialog is opened, and it will be empty if no Image Windows are open.

|
Current image in current window: |
Use the |
|
|
Check this box to instruct Mira to save an Undo copy of each image before it performs processing. Saving an undo copy doubles the memory use of each image opened in the Image Window. |
The Folder page selects images from files in a folder. Optionally, several file selection rules may be used to filter which images will be selected from the folder. If no rules are used, then all files in the folder will be selected. This page remembers its settings between sessions, however it is possible that the listed folder may not exist in a new session.

|
Select Files from a Folder using Criteria |
Use the [...] button to open a browser for selecting the folder containing the images. |
|
File Selection Rules |
This group provides optional ways to filter files from among those in the selected folder. |
|
|
To use a file name template, check this box and specify the file name template in the list box to the right. The template may be as simple as a file extension or may be a more elaborate file name pattern using * and ? wildcard characters. |
|
|
For images in FITS format, check this box to
select only image files that have the specified header keyword and
Keyword Value. For example, using Checking the |
|
Keyword Value |
Enter the value of the selection keyword. For example to select files that have an exposure time of 60 seconds, set the keyword as EXPTIME and the Keyword Value as 60. |
The Drag from Explorer page provided a drop box where files can be dropped using the drag & drop protocol. Files are selected by marking them in Windows Explorer (the file manager), then dragged onto the box and dropped there by releasing the mouse button. The drop box is empty until files are dropped into it.

|
Select Files by Dragging form Explorer |
The large box is a "file drop target" that uses the Windows drag & drop protocol. You can mark more files than will be selected by filtering the files using a file Extension, |
|
[Clear List] |
Click this button to empty the list of files in the drop box. |
|
|
Bullet this option to select all files from among those dragged from Explorer. |
|
|
Bullet this option to select files matching a specified file name extension. Starting with those files dragged from Explorer, only files with the specified file extension will be dropped into the box. The above example shows that files matching the extension *.fts will be selected. |
The Mira File List page is used for
selecting a Mira File
List containing the selected files. The Mira File List is a
single text file containing the full path specification for 1 or
more files. File lists have a .axf file extension.
This page remembers the file list between sessions, however it is
possible that the file list may not exist in a new session.

|
File list name: |
Use the [...] button to open a browser for selecting the Mira File List. |
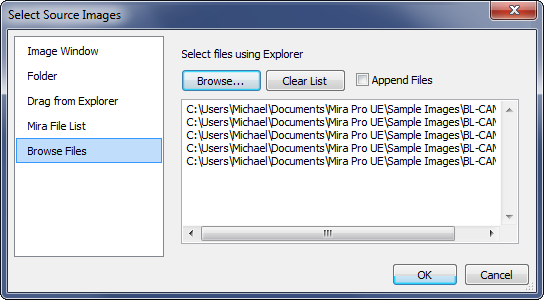
The Browse Files page opens a Windows Open dialog for selecting files. A powerful feature of this page is the Append option. This causes new files to be added to the list of files already in the box. The[Browse...] button activates the standard Windows Open dialog for selecting files. A limitation of the Open dialog is that it can only select files from a single folder at one time. Checking append allows you to browse for files multiple times, each time adding files from a new folder to the growing list in the box.
|
[Browse] |
Click this button to open a standard Windows Open dialog for choosing files. |
|
Clear List |
Click this button to clear the entire contents of the file listing. |
|
|
Click this box to allow new files to append the list of files already in the box. |