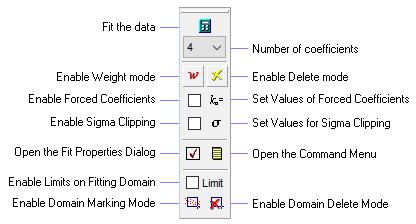
1-D Fit Toolbar
The 1-D Fit Toolbar is the user interface to the 1-D Fit Package, which is a quite of interactive tools for fitting polynomial functions to data displayed in a Plot Window. The polynomial fit is drawn on the plot and the numeric results are listed in the Main Message Pane.
To open the 1-D Fit Toolbar, right-click on the Plot Window to open its context menu, then click on the 1-D Fit Toolbar command, or use the 1-D Fit Toolbar command in the Plot Window View menu.

|
Toolbar Buttons |
|
|
|
Calculates the fit using all current settings. If
verbose mode is enabled in the |
|
|
Selects the maximum number of fit coefficients. For a polynomial, this is 1 more than the polynomial order. For example, a zeroth order fit corresponds to 1 coefficient (a constant value). Coefficients of order lower than the fit order are not fit if forced to a value or excluded from the fit (forced to 0). |
|
|
Activates Point Weighting mode. In this
mode, click on a point to assign it a new weight. Disable the mode
by clicking |
|
|
Activates Point Deleting mode. In this mode,
click on a point to delete it from being fit. Disable the mode by
clicking |
|
|
This is a 2-part button: The left-side checkbox enables Coefficient Forcing mode when you want specific coefficient values set to a value and excluded from the fitting process. The right button opens the 1-D Fit Properties dialog and selects the Set Coefs page. To force a coefficient, its value must be specified and the left-side checkbox must be checked. See Using 1-D Fit Coefficient Forcing. |
|
|
This is a 2-part button: The left-side checkbox enables Sigma Clipping to auto-reject deviant points from the fit. The right button opens the 1-D Fit Properties dialog and activates the Sigma Clipping page. To use sigma clipping, the clipping parameters must be set on the Properties page and the left-side checkbox must be checked. See Sigma Clipping in the 1-D Fit. |
|
|
Opens the 1-D Fit Properties dialog. |
|
|
Opens the 1-D Fit Menu containing optional commands. These commands are used for changing some fitting properties and other purposes. |
|
|
Check this box to limit the fit to marked regions.
Only points inside the regions are fit. The regions are marked in
Region Marking mode, which is activated
by clicking the |
|
|
Activates Region
Marking mode. In this mode, drag the mouse pointer to draw
selection rectangles; only points inside the rectangles are fit
when |
|
|
Activates Region Deleting mode. In this
mode, click inside each fitting region to delete it. Disable the
mode by clicking |
Mira Pro x64 8.72 User's Guide, Copyright Ⓒ 2024 Mirametrics, Inc.
All Rights Reserved.