![]() Screen
Capture
Screen
Capture
The Screen Capture tool allows you to record and archive the graphical parts of your work. This tool makes a 24-bit bitmap image for a region of the Mira screen. This feature is versatile and can capture to the Windows Clipboard or to a file, either one at a time or in a series of captures.
Open the Screen Capture tool from the
![]() button on the main toolbar.
button on the main toolbar.

|
Screen Capture Properties |
|
|
Capture from |
Specifies where the source image is taken from: |
|
After a capture source is selected, a brief instructional message appears above the [Capture] button. |
|
|
Capture to |
Specifies the destination where the captured bitmap will be placed:
The [Details] button is used to specify the target file where captures will be saved. This open the Screen Capture File Datails window described below. |
|
Hot Key |
Specifies the key used to trigger a capture. If using the Rectangle source, pressing the hot key allows the rectangle to be drown starting with the next mouse-down. |
|
|
Causes Mira to play a sound when the capture is complete. |
|
|
Specifies that you will be making multiple captures without returning to the Capture window. If saving to a file, the successive captures are saved with a numbered sequential filename. NOTE: Multiple Capture is an infinite loop. When you are finished capturing, double-click the Mira icon in the system tray to terminate the loop. |
|
[Capture] |
Activates the capture process, waiting for the Hot Key to be pressed to perform the capture. |
When capture is active, the Screen Capture dialog hides itself to an icon on the "system tray" (see picture below), on the lower right corner of your screen. The screen capture task hides in the Mira "M" logo as shown below:
![]()
Setup the Screen Capture dialog Properties as desired,
Click [Capture] to activate capture mode. The dialog will disappear to the system tray.
Adjust windows and their contents as desired.
To capture the screen, or begin capture in rectangle mode, press the Hot Key.
After the Hot Key is pressed, the capture is complete for all modes except rectangle mode (see section below).
If Multiple Capture is enabled, repeat beginning at step 3. To exit Multiple Capture mode, double-click on the Screen Capture icon in the system tray.
|
Note |
When you are finished with Multiple Capture mode, double-click the Mira icon in the system tray (see picture above) to terminate the capture loop. |
If drawing a rectangle, do the following after pressing the Hot Key:
Move the mouse to the initial position, press and hold the mouse button.
Move the mouse to adjust the size of the capture rectangle.
Release the mouse at the opposite corner of the capture rectangle.
To do more captures in Multiple Capture mode, press the Hot Key and repeat the procedure.
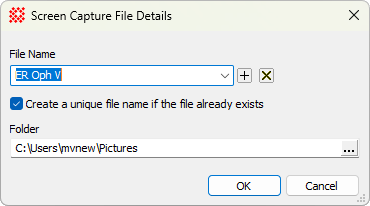
If capturing to a file, you must specify the file name and folder where the capture is to be saved. To enter this information, select the File bullet in the Screen Capture dialog and click [Details...] to open the Screen Capture File Details dialog where the file information is entered.
|
Screen Capture File Properties |
|
|
File Name |
Specifies the name of the file to be created. The file name is automatically appended with the ".bmp" extension to create a bitmap type file. If the |
|
|
To avoid overwriting files with the same name, or when making multiple captures, this option permits the File Name entry to be modified by appending a number. See the description below. |
|
Folder |
Specifies the folder where the screen capture file will be saved. |
To avoid overwriting files having the same name,
the ![]() Create a unique file
name option causes the File
Name to be used as a base name that is modified by appending
a number. Beginning with the number 1, the potential file names are
searched until a number is fond for which a file does not already
exist. For example, in the dialog shown above, the file name is
Create a unique file
name option causes the File
Name to be used as a base name that is modified by appending
a number. Beginning with the number 1, the potential file names are
searched until a number is fond for which a file does not already
exist. For example, in the dialog shown above, the file name is
MiraCapture. If a file
named MiraCapture.bmp already exists,
the file names MiraCapture_1.bmp,
MiraCapture_2.bmp, etc., will be
searched until a non-existing file name is found.
Mira Pro x64 User's Guide, Copyright Ⓒ 2023 Mirametrics, Inc. All
Rights Reserved.