Markers Page (Star Removal)
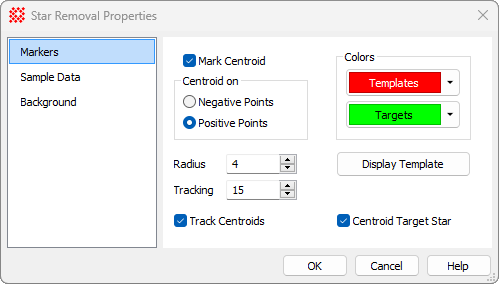
Most options on the Markers page control the way templates and target objects are marked on the images.
The Radius and Tracking Properties affect the measurement of object positions in single images and when tracking positions through an image set. These are described in the table below.
|
|
Check this box to cause Mira to compute a precision centroid coordinate whenever you mark a template or target point. If not checked, then Mira will use the exact position you mark with the mouse. |
|
Negative Points |
Choose this option to compute the centroid position based on negative deviations below the background. Use this option when the images being measured are actually negatives (not positives displayed as negative; see Image Palettes and the Palette Properties dialog). |
|
Positive Points |
Choose this option to compute the centroid position based on positive deviations above the background. This is the typical case |
|
Radius |
Defines the radius, in pixels, from the target point within which pixel data are used to compute the centroid position. A reasonable starting point for choosing a value is 2 times the FWHM. (Note: FWHM measures a diameter and this parameter is a radius). |
|
Tracking |
Defines the maximum distance, in pixels, from the current position that Mira will search in the next image to lock onto a new position. This is only used when tracking objects through an image set. |
|
|
Controls the duplication of markers when the positions are "tracked" through an image set. If this option is checked, the positions are centroided in every image. |
|
Show Template |
Click this button to display the master template in an Image window. If working with an image set, only the template for the current image is shown. The Properties dialog must be closed to work with the template and other image windows. |
|
|
Check this box to centroid the template mask on the target star. This automatically moves the template mask to the brightness center of the target profile. This is usually the appropriate setting. However, if the target star is in a crowded region or has a nearby companion star, the centroid can calculate the wrong position by including the wings of the companion star's light profile. To prevent this behavior, uncheck this box; this causes the template mask to center exactly where you click the mouse on the target star. |
Centroid positions are computed using image data, not the screen display. Choose Positivepoints or Negative points based upon the type of object to measure rather than the palette or other image display properties. For modern, inherently digital images, you will almost always choose Positivepoints. However, when working with a scanned photograph you may find that stars are negative deviations from the background, so you would choose to centroid on NegativePoints.
Mira Pro x64 User's Guide, Copyright Ⓒ 2023 Mirametrics, Inc. All
Rights Reserved.