Label Properties
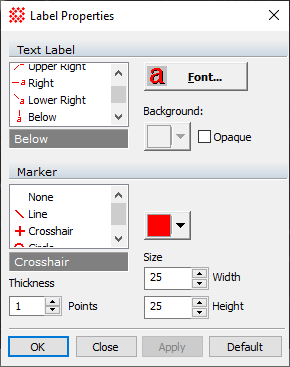
The Label Properties dialog is used to configure the way labels appear on an image. Labels are created using the Label Toolbar (see the Labeling Images). Using this Dialog to change the font, color, position, marker, and other properties of labels. Settings can be applied to the current Image Window only or they can be made the default for future use by clicking the [Save] button.

Label Properties
|
Text Label |
|
|
(selection) |
Select the type of line to draw between the text and the marker. |
|
Font |
Select the font to use for label text. |
|
|
Opens a Color Picker dialog for choosing the label text color. |
|
|
Check this box to make the label text opaque against the image. |
|
Marker |
|
|
(selection) |
Select the type of marker to draw. |
|
|
Opens a Color Picker dialog for choosing the label text color. |
|
Thickness |
Specifies the line thickness, in screen pixels, of the marker lines. |
|
Width |
Specifies the width, in screen pixels, of the marker. |
|
Height |
Specifies the height, in screen pixels, of the marker. |
The way the marker appears is affected by both the Marker Style and the Size Properties. The Size settings are different for circle labels and line labels. For example:
For a Line style label, the angle of the line can be changed by using the Text location to choose the quadrant around the point of interest, then using the Width and Height settings to control the direction in that quadrant.
For a Circle label, the size Properties become Diameter and Offset for adjusting the text position relative to the circle.
Mira Pro x64 User's Guide, Copyright Ⓒ 2023 Mirametrics, Inc. All
Rights Reserved.