Create Pixel Mask
The Create Pixel Mask command creates a
pixel mask, which is a list containing the (column,row) coordinates
of pixels. The pixel mask is used by the Apply Pixel Mask method
to repair defective points at the mask coordinates. To create the
pixel mask, defects are identified in a source image by testing for
pixel values greater than and/or less than specified values. The
identified pixels are saved to a pixel mask file which is then
loaded by the Apply
Pixel Mask command. You can also edit this pixel mask file (or
any pixel mask file) using the Edit Pixel Mask command.
-
The Create Pixel Mask command opens from
the Image Window > Process >
Calibration menu and  button
on the Main Toolbar. The "immediate"
form, shown first, opens when an image or image set is displayed in
the top-most window. The general form can be used to select source
images from folders, windows, or by matching templates.
button
on the Main Toolbar. The "immediate"
form, shown first, opens when an image or image set is displayed in
the top-most window. The general form can be used to select source
images from folders, windows, or by matching templates.


|
Create Pixel Mask Properties
|
|
Profile [|>]
|
Manages the parameter collection used by this
dialog. See Profile
Control for details.
|
|
Select
|
Opens the Select Source Images dialog for selecting an
image to be scanned for deviant pixels.
|
|
Source Image
|
The image containing errant pixels that will be
detected for creating the pixel mask.
|
|
 Greater than Greater than
|
Identify errant pixels greater than the specified
value.
|
|
Less than
|
Identify errant pixels less than the specified
value.
|
|
Include Pixel Values in
the Mask File
|
When creating the mask file, include the values of
the detected pixels. If not checked, the pixel mask contains only
the (column,row) coordinates of the detected pixels.
|
|
Use Cursor ROI
|
Identify pixels only inside the image cursor
ROI.
|
|
Preview Mask File
|
After saving the pixel mask to a file, it is
opened into the Pixel Mask Editor dialog.
|
|
List Messages to
|
Selects whether processing messages are written to
a Text Editor Window
or the Main
Messages Pane.
|
Overview of the Method
A pixel mask contains (x,y) pairs of pixels. The
purpose of this command is to automatically identify pixels having
extreme values and save them into a pixel mask file. Later, that
pixel mask file may be edited to remove or correct coordinates or
to add coordinates that were not identified by the present command.
This command creates the pixel mask from a source image, which must
be chosen from one of the displayed images. To identify pixels for
inclusion, their values either must be very high or very low
compared with "normal" values occurring in the source image. You
can use this command to identify values that are high, low, or
both, and may be anywhere in the image or within a rectangular
region of interest.
To use this technique to create a pixel mask, you
need a source image containing high or low pixels that are
defective. Usually a dark frame or a flat field frame is used for
this purpose, since the dark frame shows hot pixels well above the
normal distribution of values and a high-signal flat field frame
reveals "cold" pixels far below the normal distribution of values.
The threshold values can be determined before opening this dialog
or afterwards by inspection of the source image. This dialog does
not take command of the screen, so you can determine the threshold
values while the dialog is open by roaming the cursor over the
image or by doing image statistics or other analyses.
The result of this command is a collection of pixel
coordinates saved as a Pixel Mask File of typepxm. The pixel mask is saved in the folder of the
source image, using the same file name, with"_PixelMask.pxm" appended to the image name. A
summary of results is listed in the Message Pane.
After running this command, you can view and edit
the pixel mask file using the Edit Pixel Mask command. The pixel mask is separately
applied to other images using the Apply Pixel Mask command.
|
NOTE
|
This command uses the Processing Image Set Flag on the
Image Bar to determine
the number of pixel masks to create when the target Image Window contains an
Image Set. If the flag
is set to process all images, then a pixel mask is created for each
image in the image set. If set to process 1 image, a pixel mask is
created only for the current image.
|
Detecting Hot Pixels
Select a dark frame in the Image field and check theGreater than option. This will identify pixels
that are greater in value, or "hotter", than the threshold value.
Enter a threshold value that is below the values of the hot pixels
but is above the values of the "good" pixels in the dark frame.
Detecting Cold or "Dead" Pixels
Select a bright flat field frame in the
Image field and check theLess than option. Enter a threshold value that is
above the values of the cold or dead pixels but below the values of
the typical "good" pixels.
Results of Create Pixel Mask
Typical results of Create Pixel Mask are
shown below listed in the Main Message Pane, but they may also be directed to a
Text Editor Window.
One advantage of the Main Message Pane is that it may be collapsed or
tabified to hide it from the desktop. An advantage of using the
Text Editor Window is that it provides additional formatting
capabilities such as fonts, bold text, etc. However, the contents
of the Main Message Pane may at any time be directed to a
Text Editor Window using a command in its pop-up menu. The
command was run on an Image Set of 5 images, hence 5 pixel masks were
created.

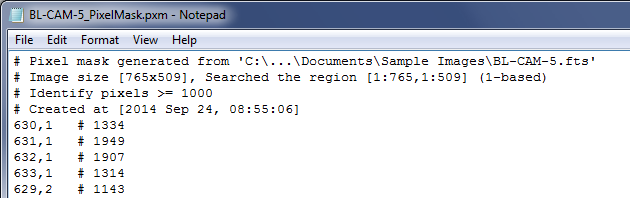
The pixel mask created from the 5th image of the
image set was opened in Notepad as shown below:
Related Topics
Repairing Artifacts and Cosmetic Defects
Apply Pixel Mask
Edit Pixel Mask
Edit Blemish Mask
Clean Image Set
Express Image Calibration
Mira Pro x64 User's Guide, Copyright Ⓒ 2023 Mirametrics, Inc. All
Rights Reserved.