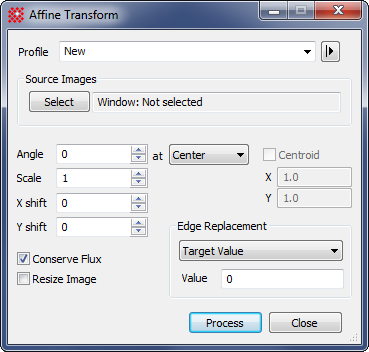
Affine Transform
The Affine Transform command applies a scale, shift, and rotation to an Image Set or a single image.
This command opens from the Process > Geometry menu.

Properties of the Affine Transform command
|
Profile |
Selects the parameter profile for this command. |
|
[Select] |
Selects the source images from an image window, folder, files, pattern, or a file list. |
|
Angle |
Enter the angle in degrees. You can use the up/down arrows to select an angle in steps of 0.01 degrees. |
|
at |
Select whether the rotation is done about the Image Center or Cursor Position. If you choose the Cursor Position, then you need to specify whether too use the centroid position near the cursor center—use this choice when you want to rotate about the center of a star or other object. |
|
Scale |
Enter the scale factor. A factor greater than 1.0 enlarges the image, making each of the new pixels cover less area than in the original image. A value smaller than 1.0 decreases the size of the image. |
|
X Shift |
Enter the shift in the X (column) direction, in units of pixels. |
|
Y Shift |
Enter the shift in the Y (row) direction, in units of pixels. |
|
|
Check this box to retain the image signal per unit area when the image is magnified. For example, if you magnify the image by a factor 2 (4 times change in area), then the signal per pixel will decrease by a factor of 4. If this box is not checked, the signal remains the same. |
|
|
Check this box to resize the image when the image is rotated. Resizing allows the new image to hold the corners of the rotated image. |
|
|
This parameter is used when rotating about the Cursor Position. Check this box to rotate about the centroid coordinates near the middle of the cursor, such as when you want to rotate around the center of a star or other feature in the image. |
|
Edge Replacement |
Select the method used to fill blank pixels that come onto the edge of the transformed image. If you choose Image Margin, Mira will fill the pixels with a value typical of the original image margin. If you select Specified Value, then Mira fills the margin with the number you specify in the Edge Value parameter. |
|
Edge Value |
Enter the edge value used to fill empty pixels when the Edge Replacement choice is set to "Specified Value". |
Flux is the arrival rate of photons per unit area. If we were to spread the same amount of energy over a larger area, the signal detected per unit area (that is, per pixel) would be reduced because the number of photons arriving per unit area is conserved. This is like measuring the water depth after pouring the same 1 liter of water into a narrow pan or a broad pan. If an image detected a luminance of 2000 counts per pixel and you were to scale it by 2X, the energy density is reduced by a factor of 4. The signal per pixel would be 1/4 as great, or 500 counts. There are time that you want to account for this fact and there are times you do not. Mira allows you to choose whether to conserve the flux using the Conserve Flux check box.
The "edge" refers to the blank pixels that move into the output image from off the edge when you shrink the image using a scale factor < 1 but you do not choose to resize it. This leaves a border of "blank" pixels around the edge. These pixels have no value but something must be done with them. Mira gives you two options for assigning them a value:
Use a typical value for pixels near the margin of the original image. This is done when you select Edge Replacement = "Image Margin"
Assign a specific edge value, such as 0. This is done when you select Edge Replacement = "Specified Value" and you enter the new value for the Edge Value parameter.