Import Photometry Catalog
The Import Photometry Catalog tool automatically performs photometry on one or more images by obtaining coordinates and other photometry information from a text format "Import File". The Import File directs the location of coordinates on the images and may also define their standard magnitudes and other properties. This file may be a text file created using an editor like Microsoft Notepad, a text listing from a coordinate database or a TXT format file saved from a Mira photometry report.
Open this dialog by clicking the [Import Catalog] button on the Points page of the Aperture Photometry Properties dialog.

Before importing a catalog, be sure the appropriate tracking properties are set on the Point Markers page, such as Mark Centroid. For importing to an Image Set, be sure the Track Centroids option is set appropriately.
Import File Details
The Import File must be a text format (TXT) file consisting of data in columns separated by tabs, one line per object. Not all columns need to be used during the import but you must select which columns contain the data of interest. As a minimum, the object positions must be imported as x,y (column, row) values or as (RA, Dec) values. The dialog has a list box from which you choose the format. If the import file is saved from a Mira photometry report, be sure that the file contains only 1 line per object, so saving a report from photometry of an image set usually would need to be edited using, e.g., Microsoft Notepad, to remove multiple entries of the same star on multiple images.
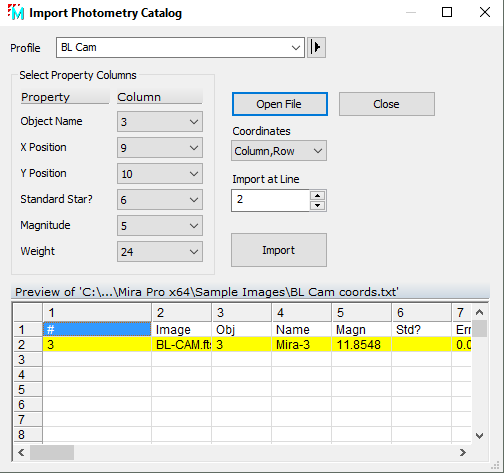
After selecting the Import File, the first 50 columns and 50 lines of data are inserted into the Preview table so you can choose the column assignments and the first line to begin importing the photometry information. However, the actual Import File can contain any number of lines (objects). Before importing, you must associate the column numbers with the quantity to be imported. You must also skip over all lines of column heading information that may exist in the Import File. In the example shown above, the magnitude is listed in column 5 and the first line of object data is in line 2. Therefore, to import the magnitudes of objects that are standard stars, you must select "5" in the Magnitude field in the top left section of the dialog, and you must set the Import at Line value to "2" as shown.. Mira can also skip undesired objects by setting theImport at Line value appropriately.
An Import File containing both standards and unknowns must have a column dedicated to specifying whether the object is a standard or unknown. This column is specified in the Standard Star ? field. The line for each standard must identify the object as a standard using the lettery or an * (asterisk). A non standard object then must contain a blank character in that same column. The example above shows column 6 as the standard column and it is blank, indicating the object is not a standard.
|
Note |
This command can only import text files that use tabs to separate columns. |
Click [Open File] to select the catalog file using the Open dialog. The contents of the file are listed as a grid in the Previewsection of the Import dialog.
Determine which columns contain the listed Property and, for each property, select the column number where that information is found in the import file.
Select the position format using the Coordinates selector. Only (Column, row) and (RA, Dec) formats are available. RA and Dec values may be interpreted in various formats such as 12h14m13.555s or 21.444532 or 19 12.5566. Each field may contain blanks, as in "19 12.5566" but cannot contain a tab because tabs are used only to separate the data columns.
Determine which line at which to begin loading data using theImport at Line field. For example, if there is 1 line of column headings, as shown above, set the import to begin at line 2.
Click [Import].
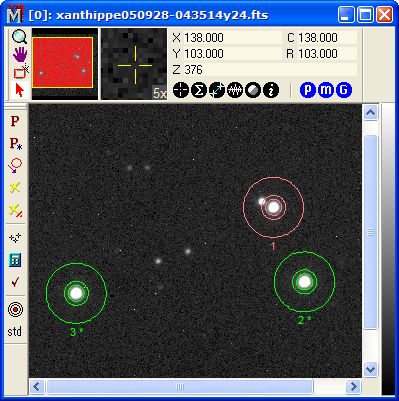
After import, the Image window looks like that shown below with new objects marked on the image. These objects were imported by (Column,Row) coordinates. If they would have been (RA,Dec) coordinates, Mira would have used the WCS calibration from the image header to compute the image (x,y) positions from the catalog (RA,Dec) positions.

In the above example, the Mark Centroid option was checked on the Points page so that the positions were centered on the stars near each imported coordinate. This option can be turned off to use the exact coordinates from the database.
If working with an Image Set and the images are reasonably well
aligned, you can paste the imported objects into the other images
by clicking ![]() on the toolbar. This button tracks
the centroid position of each object through the image set.
Alternatively, the Auto Process
option can automatically track the positions and perform the
measurements.
on the toolbar. This button tracks
the centroid position of each object through the image set.
Alternatively, the Auto Process
option can automatically track the positions and perform the
measurements.
If importing positions by (RA, Dec), the images must possess a WCS (World Coordinate System) calibration. Otherwise, Mira cannot determine the (column, row) position of the objects in the image. If the Track Centroid option is checked on the Point Markers page, the computed (column, row) position of each object will be refined by centroiding after applying its WCS transformation.
To copy the new object list to another Image Window, use the Copy Markers and Paste Markers commands.