Create Image Catalog
The Create Image Catalog command generates a
table, or "catalog", of image properties such as size, type,
exposure time, etc. The results are listed in a Report Window which
includes standard tools for working with tabulated results. The
results may be saved to a text file, copied to the Windows
clipboard, or printed. See Arranging Grid Data.
This command is available in the File menu and the Main Context Menu.
Quantities Tabulated by the Catalog Command
|
Column
|
Definition
|
|
#
|
Sequential number in table
|
|

|
Check this box for each image you want to display.
To select all images (or unselect all images), check the box in the
top header row.
|
|
File Name
|
The File name without path
|
|
Object
|
OBJECT keyword (name of the target)
|
|
Type
|
IMAGETYP keyword (bias, dark, etc.)
|
|
Exp
|
EXPTIME keyword (exposure time, in seconds)
|
|
Filter
|
FILTER keyword (filter used for the image)
|
|
Time
|
TIME-OBS keyword (UT at beginning of exposure)
|
|
Date
|
DATE-OBS keyword (UT Date at beginning of
exposure)
|
|
RA
|
RA keyword (Right Ascension)
|
|
Dec
|
DEC keyword (Declination)
|
|
Cols
|
NAXIS1 keyword (image columns)
|
|
Rows
|
NAXIS2 keyword (image rows)
|
|
File Path
|
The full file path
|
The Catalog Report
When you execute this command, Mira opens an
Open dialog like
that used to open files for display. As for displaying an image,
simply mark the images you wish to list in the catalog Report Window. This tool
works best with FITS format which contains a rich assortment of
useful information in the form of keywords. Some formats such as
JPEG or BMP do not contain the keywords for all table cells.

|
Tip
|
If you run this command multiple times, new
information is always appended to the existing Image Catalog
window. To begin with an empty table, delete its contents using the
View > Clear
command from the Report Window menu, or simply delete the window
using its [X] button.
|
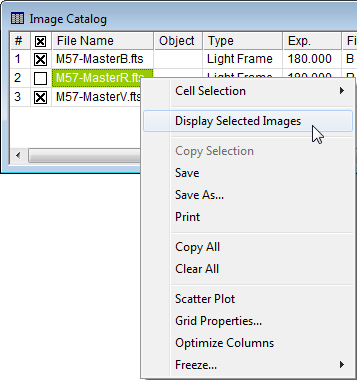
Command Menu
A command menu opens with a right-click on the
grid. This menu contains typical functions plus theDisplay Selected
Images command. to display images from the catalog,
To select images, mark the checkbox in its row. To select all
images, check the box in the top header row. Alternatively, to
display one image at a time,. you can skip using the checkbox and
simply double clik on the row containing the target image.
Related Topics
Image
Information, FITS Header, Opening and Saving Files